Let’s talk audiograms! More specifically, the best podcast audiogram examples!
Have you seen those enticing posts on social media, featuring images from a podcast creator you follow? They usually look like a video or reel with an audio wave graphic and a snippet of a podcast episode.
They’re called podcast audiograms!
An audiogram is a graphic that can be used on social media and elsewhere to promote your podcast. These images are usually simple, fun, and easy to create—and they’re another tool in the arsenal of great content creation strategies.
In this article, we’ll go over what an audiogram is, how to make one, which apps you can use, and why audiograms are a smart content creation strategy for social media.
What Is An Audiogram?
A podcast audiogram is a visual representation of a short audio clip from a podcast. There are a lot of podcast networks popping up all over the web and they are bringing with them an influx of audiograms simply because they provide a lot of benefits for podcasters.
Audiograms are eye-catching. When it comes to images, a picture paints a thousand words, but when it comes to audio files, the possibilities are endless! As audiograms are naturally more engaging than static images or text posts, they’ll attract people who wouldn’t necessarily click on links.
There will be more people hearing about your podcast and making a decision about whether or not they want to listen to it.
Why You Should Use Podcast Audiograms In Your Content Marketing Strategy
Creating podcast audiograms provides a helpful tool for listeners to retain the information they hear. In addition, audiograms for podcasts give you another way to connect with potential new podcast subscribers. If they haven’t listened to your podcast yet, fans will be more likely to check out your podcast and audio content after seeing an audiogram featured on your social media feeds.
Podcast audiograms can be a really helpful way to deliver information, whether you’re providing a message to your audience or just sharing a lively conversation. You’ll be able to provide short poignant clips that deliver value from an episode without needing to listen to the entire episode. Your audience will be able to read the content rather than listening, which is more accessible and also accounts for those that scroll social without their volume on.
Podcast audiograms are a way to brand your podcast – people think you cannot see audio, but they’re wrong. Audio is represented by what are known as waveforms and waveforms visually represent what you’re hearing. They’re a bit boring on their own but when you surround them with the colors, logo, and even faces of your podcast, the audio comes to life.
Add words and you’ve done what some thought was impossible… make audio visual.
Audiograms are short clips of audio that can be used to promote podcasts, share episodes on social media, and more. They don’t have to be very long; in fact, they’re often just quick snippets. It is also possible to design audiograms in a way that suits the style and theme of your podcast.
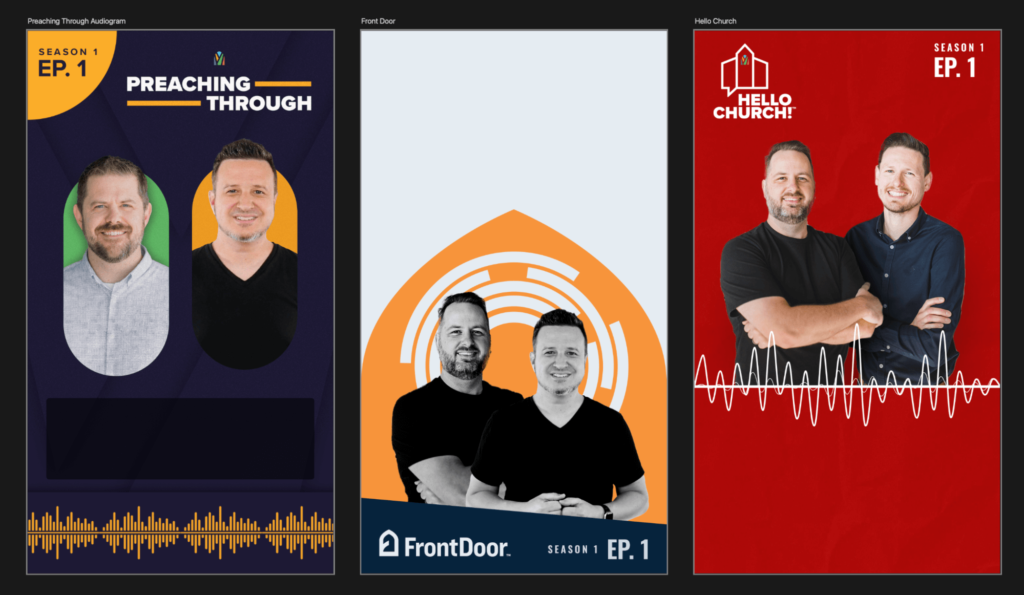
For instance, here are three audiogram templates from the Ministry Pass Podcast Network ready to be shared!
An audiogram might contain sound effects like a crash, a chime, or musical interludes in the background that are. An example of this could be sounds from a new smartphone or tablet application if, for example, your series is about how people use technology every day.
Turn Podcast Audio Into Video Clips to Capture Attention
The entrepreneurs who are doing this well are ahead of the curve, getting a boost in their listener count, and a bump in their replay analytics. It can be difficult to market and promote your podcast if it’s only an audio file, so creating a visual form of the podcast content is key.
Visual content is key on social media because it helps to capture people’s attention. By creating a visual representation of your podcast, you make it easier for people to understand and engage with the content. Additionally, you’ll be able to grow traction using things like Instagram stories and Reels, as well as TikTok, channels that do not post raw audio podcast content.
Podcast audiograms can be a very effective way to deliver information about your product or service in an easily digestible format that makes it easier for people to find what they need quickly—and more importantly: remember where they found it!
Best Examples of Podcast Audiograms for Social Media
To help get you started with creating interesting audiogram videos for your own podcasts, we’ve collected lots of helpful examples in this article. These audiogram examples are meant to give you some inspiration and ideas about what is possible.
Truthfully, there are a lot of bad audiograms out there and finding a list of audiogram designs that do this shareable content justice has been pretty difficult to do. That said, we feel good about the list we’ve compiled below and we believe you’ll be inspired to create designs that are elegant and simple for your brand.
Here are some of the most influential people to follow on social media that use audiograms as a part of their content creation strategy:
Fully Free with Taylor Lee
Taylor Lee from Fully Free with Taylor Lee uses her audiogram as a way to engage listeners and connect with them on social media. This podcast is from coach Taylor Lee who focuses on business for women. Her audiograms mainly show up in Facebook or Instagram Stories and are varied over time.
David Tennant is a Scottish actor who has starred in many television series, including Doctor Who, Broadchurch, and Jessica Jones. His podcast uses audiograms on social media to promote his conversations with his guests.
Podcast But Outside used this clever audiogram over video of their interview about divorce with a woman on a street corner.
When we talk about audiograms we typically mean a wave pattern displayed over a static image, but technically you could leverage video of your podcast as ‘audiogram like’ content.
Bloomberg Podcasts use audiograms to promote lots of their episodes. This podcast audiogram from their show Odd Lots uses graphics to convey their points, featuring photos of two of their hosts.
The Financial Times’s Dan McCrum (@FD) and Paul Murphy (Tracy’s old boss) join #OddLots to talk about their multi-year effort to expose fraud at Wirecard, a German payments giant that went spectacularly belly-up
The Nerdette Podcast shared this on-topic graphic for their episode on mask wearing indoors during the pandemic. They also use captions at the bottom of this audiogram, shared on Twitter.
— Nerdette Podcast (@NerdettePodcast) May 28, 2022
The Art of Charm Podcast
The Art of Charm podcast creators used this graphic on Twitter for their podcast audiogram. With a video of the episode creation as the background and the title of the episode at the top, it would be easy for someone who isn’t a regular listener to find other episodes if they needed.
This is another example of using video footage from your podcast in your clip.
Who to ask for mentorship and who to avoid 🧐
We have to take risks in order to become great at anything, but what do you do if that risk stops you dead in your tracks?
— The Art of Charm | Podcast | Coaching Company (@TheArtOfCharm) June 30, 2022
Change Makers Podcast
Change Makers used an audio waveform with some static images in the background. One image features their guest, and the other is their podcast show graphic.
Marsha Acker, on her podcast, Defining Moments of Leadership with Marsha Acker, used an audiogram to share a crucial point from her conversation with her guest in this episode, Christopher Curley.
On the Instagram feed for the Screens in Focus podcast, you’ll find an audiogram talking about the episode’s subject matter – in this case, a specific episode of The Walking Dead.
Emma Dunwoody, a podcast content creator, shared this audiogram from her podcast in a vertical video format, with an audio wave and some background music.
Applications for Creating Podcast Audiograms from Free to Paid
There are lots of easy drag-and-drop creators if you’re creating your first podcast audiogram. Depending on how much time you want to spend designing your visuals, you have options.
There are many podcast audiogram creation apps from free to paid. If you want to spend money on your first audiogram, there are plenty of options out there. There are also easy drag-and-drop creators for those who aren’t into the technical side of things.
If this is your first time making an audiogram, try a free tool and see what it’s like. Decide how much time you wish to spend on creating this visual and make sure it fits into your schedule!
Create Your Own Audiogram Videos with Free Creator Apps
While there are many platforms that allow your audience to listen to podcasts directly from the audio player, audiograms offer a way for podcast creators to share short clips of their podcasts on social media, providing another way to develop brand awareness and allow potential subscribers to listen in without committing to an entire podcast episode.
Audiograms are visually enticing, simple to create, and easily shared… and on social media platforms that prioritize video, they offer a huge algorithm advantage over quote graphics or episode covers.
There are plenty of audiogram creator apps that are free to use and offer basic visual settings. If you prefer to have more control over the look and feel of your audiogram, there are also audiogram creator apps that let you customize every element. This comes at the cost of your time or the time of your team if they’re making them for you.
You can create audiograms in minutes with the following elements:
MP3 of your audio clip
Your podcast or company logo (preferably a transparent PNG)
An established color palette.
The result of using podcast audiograms? A smart collection of video content and efficient use of your time and podcast collateral.
If you don’t know how to make an audiogram, don’t worry! It’s super easy. You just need a few minutes, a desire to learn, and podcast content… oh, a computer, too. Even if you don’t have a podcast, you can still create an audiogram with any type of audio source.
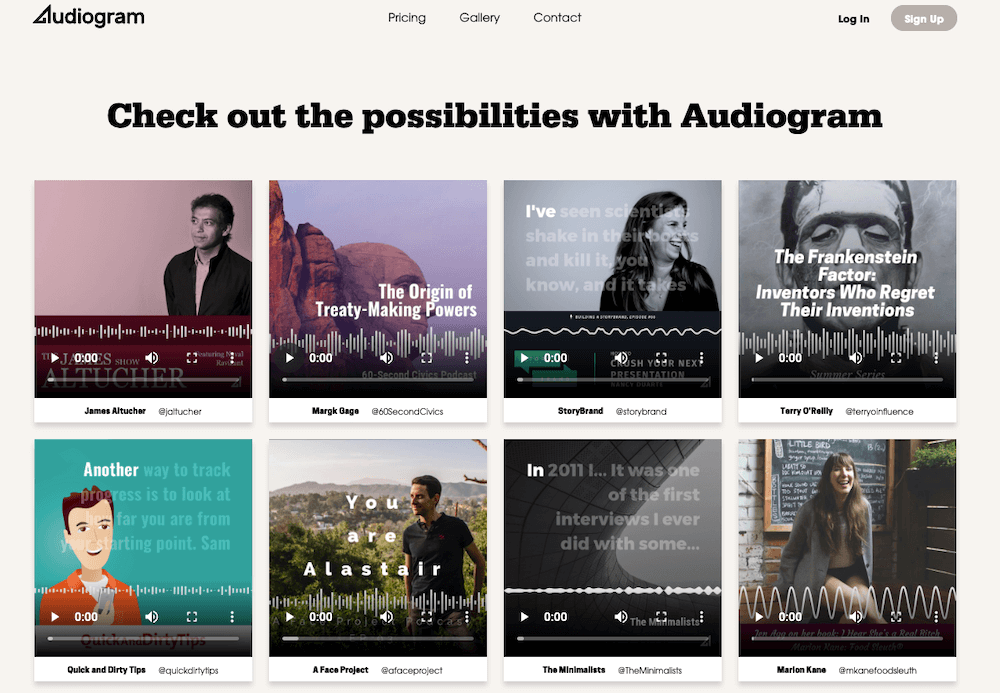
Audiogram: Turn Audio Into Engaging Social Video
Audiogram is a program that turns audio into videos that can be shared on social media. It automatically transcribes captions making adding captions a breeze. It has a library of visually striking attention-grabbing templates that are always on-brand. The templates Audiogram offers are in all shapes and sizes for reaching new listeners everywhere.
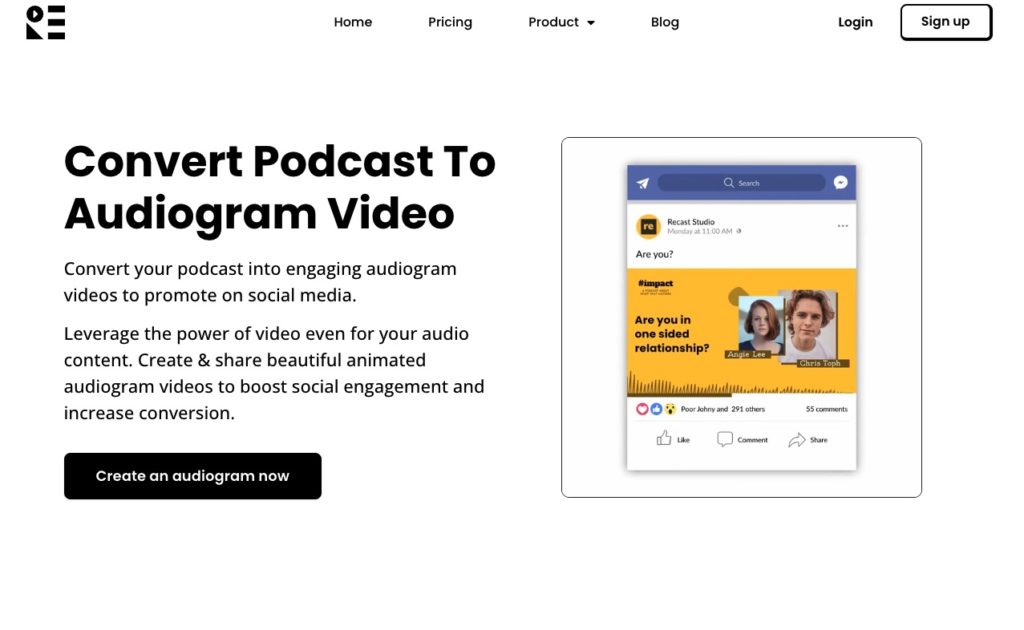
Recast: Convert Podcast to Audiogram Video & Promote On Social Media
Recast makes it easy to create audiogram podcast videos in all formats. Businesses and professionals who want to create engaging video content for social media can use Recast easily. With options like text customization and complete branding control, your audiograms can match your social media feed’s aesthetic.
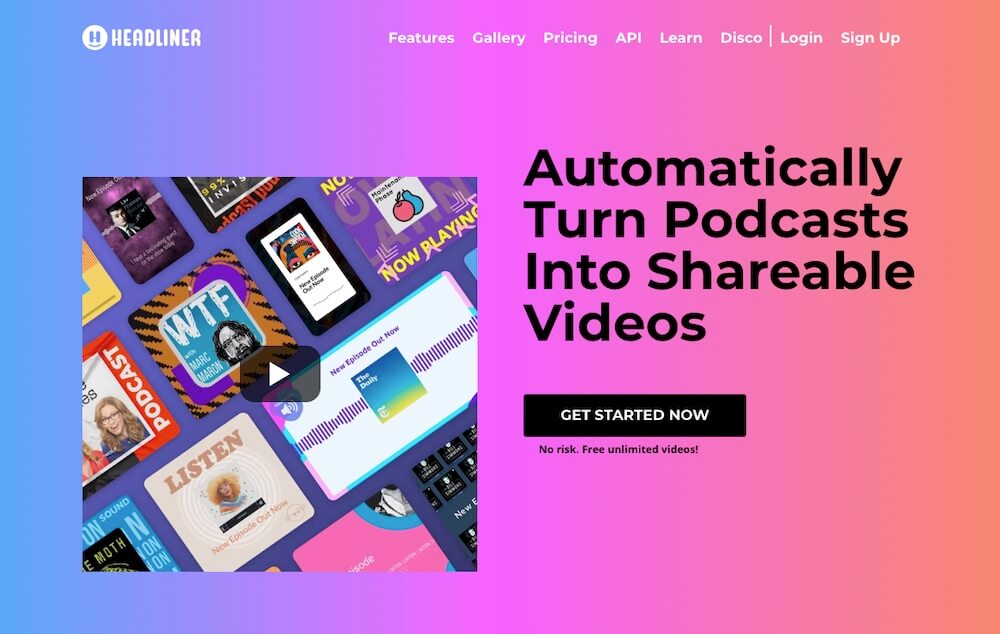
Headliner
Headliner is a program that helps you make videos to promote your podcast. You can add animations, captions, gifs, videos, and images to your videos, and then export and share them across your social accounts. It allows users to create unlimited videos for free and is optimized to promote podcasts on every social media platform. Headliner also has transcription capabilities that automatically caption videos. This makes it an ideal tool for podcast creators who want to reach a wider audience by providing captions with extra accessibility.
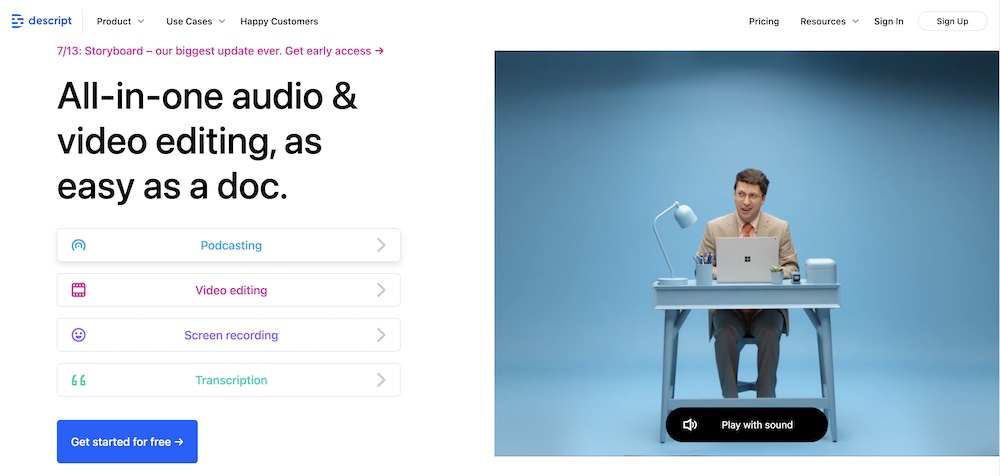
Descript: All-in-one audio & video editing, as easy as a doc.
Descript is an all-in-one audio and video editing tool that is as easy to use as a word processor. It has powerful transcription and screen recording features. It offers social video publishing and audiogram creation easily from its platform.
Descript is by far the most customizable audiogram creator by way of simple programs to operate. Yes, you could open up apps like Adobe Premier or Final Cut Pro X and find ways to bring to life a more customized design, but that involves an entirely different set of skills to complete.
If you’re just starting out, the prospect of using such a robust software can be daunting. Starting with an app that is just as capable but easier to use, like Descript, is a great way to hone your skills and also start promoting your podcast with audiograms.
Descript has long offered an audiogram generator feature in their downloadable desktop app. It allowed you to cycle through a fairly large collection of design options while still locking you into a small collection of design layouts.
This is no longer the case.
In the video below you can see just how much functionality Descript has built into their app and after watching you should have a pretty good idea of whether or not this is the type of featureset you’re looking for.
Increase Podcast Subscribers by Posting Podcast Audiogram Clips On Social Media
As a podcaster, you’re probably already aware of the importance of social media. Networks like Twitter, Instagram, TikTok, and Facebook all have users that would be a perfect listener base for your podcast. If you have a podcast, making an audiogram for each social network is a great way to share your podcast in a unique way to each audience.
Social media networks are not just a place to post your latest episode; they’re where you can grow your listener base and build your brand. This is exactly where audiograms come in.
Once you’ve created your audiogram(s), all that’s left is posting them on social media! Just remember: don’t put too many out at once—you want people to be able to see each individual post without scrolling through tons of other posts first.
Creating Podcast Audiograms As Part of A Social Media Strategy
Audiograms are a smart part of a content creation strategy to build authority and community around your brand, your social media, and your podcast.
Upload your audiogram video to social media. Videos perform very well with organic reach.
Your podcast will now appear as a video in the network feed and users can get a taste of what your entire podcast is all about.
More people consuming samples of what you have to offer will translate into ideal listeners finding the full episode.
All of this equals more subscribers!
In order for your content creation strategy to work effectively, you need to plan your social media posts in advance. If you batch create your posts and write them in advance to post on a schedule, you’ve freed yourself up from needing to post in the moment.
If you encounter existing followers on social media, this can be beneficial as well. They may interact with your content the next time via social media, and not realize that you’ve released a new podcast episode. The podcast audiogram post on social media can serve as a reminder for them to listen to your newest episode.
For a podcaster, it helps give your prior episodes a little more traction after they’ve had their initial listener spike in your analytics and the traffic has died down. It can help you re-use content you’ve already created. This is an easy way to “pad” your social media posts with easy content to choose from. You won’t have to start every post from scratch because you’re working smarter, not harder.
By enticing your community and followers, you can highlight the meaningful conversations you’re having on your podcast. This strategy helps you make use of the content you’ve already created.
Saving and Organizing Your Podcast Audiograms with Your Other Content Marketing Materials
Campaign Donut is an amazing resource for housing all of your marketing collateral, like audiograms and podcast files. Not only can you store your data, you can email your listeners and your subscribers right from our platform. With each email, graphic, audio file, social sharing image, and more organized neatly, you save time every time you work on your marketing.
Repurpose Podcast Audio to Make Full Use of Your Content
If there’s a past episode with content that would be relevant to your social media following in the coming month, make an audiogram from some key parts of your podcast audio. Then, queue that podcast audiogram (using Campaign Donut) onto your social media channels.
Audiograms are a great way to drum up excitement for news podcasts episodes while leveraging great content from past episodes as marketing material.
Audiograms aren’t just for Podcast episodes… you can use them however you see fit! For instance… If you’re intending to be away from social media for a while (like on vacation), create an audiogram that tells people when they can expect to hear from you again—and then post an audiogram when you return. This will let them know that you are back and ready to take on business.
Podcast audiograms are an essential part of your marketing and should be included in your overall strategy for growth.
A well-planned podcast audiogram is an important part of your podcast strategy if you are looking to increase your social media presence. In addition to engaging listeners, it adds an additional level of exclusivity and personalization, which makes them feel like they’re part of something extra-special.
You’ll have better engagement, they’ll want to share this experience with their friends, and most importantly, they’ll become more invested in your brand.
There is no shortage of podcast audiogram tools out there, and it can be overwhelming to know which one to choose. In this article, we have highlighted some great examples to inspire you, and the apps we recommend are waiting for you to download so you can get started right away!
Create your first audiogram and tag us when you post it! We’d love to see what you create!
Links can get pretty ugly and the last thing you need for your business is to connect your beautiful, well-crafted, protected brand image along side a nasty, 230 character URL. That’s where URL shortener services come in handy.
There’s a good chance you’ve seen URL shortener services in action — and not even realized it. For those who may not be familiar with what a URL shortener is, we have you covered.
A URL shortener service takes a long, ugly, nonsensical website address URL, 50, 100, even 200 characters long, and shortens it to a more palatable and pleasing to the eye URL in a standardized format.
TL;DR – Which URL Shortener Is Best
Just want to know which URL shortener to use?
Cuttly is full featured and free, but no integrations. If you’re just looking for a simple URL shortener that provides statistics, Cuttly is hard to beat.
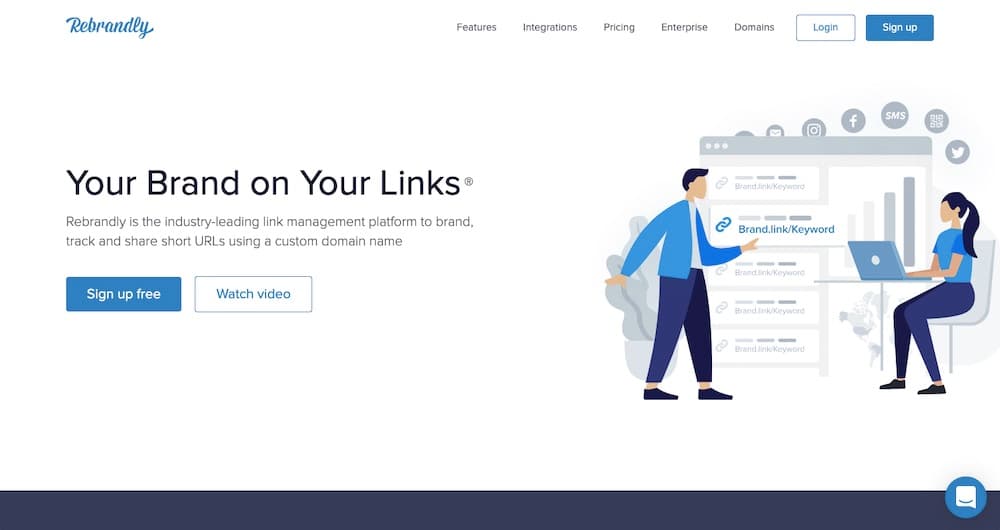
Rebrandly is powerful, affordable, and well integrated with other marketing tools and apps. It is not the cheapest, but it is the most forward thinking.
GoDaddy is hard to beat if all you need is a simple URL shortener and nothing else. It’s free to use as long as you have an account with them and integrates with domain names purchased through GoDaddy but not assigned to hosting.
An Example of How URL Shorteners Keep Things Clean and Simple
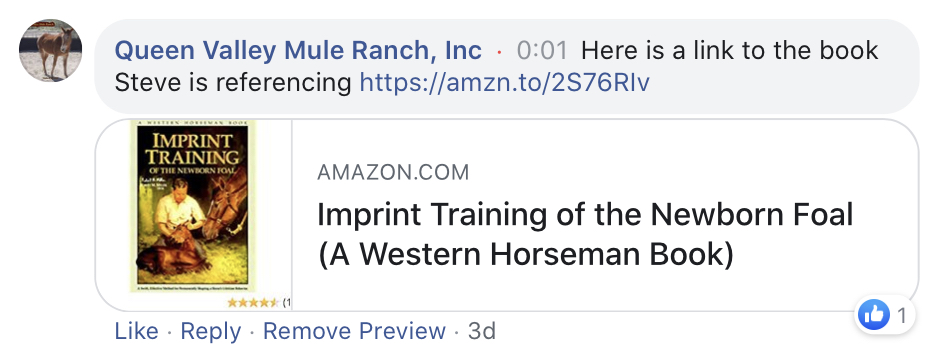
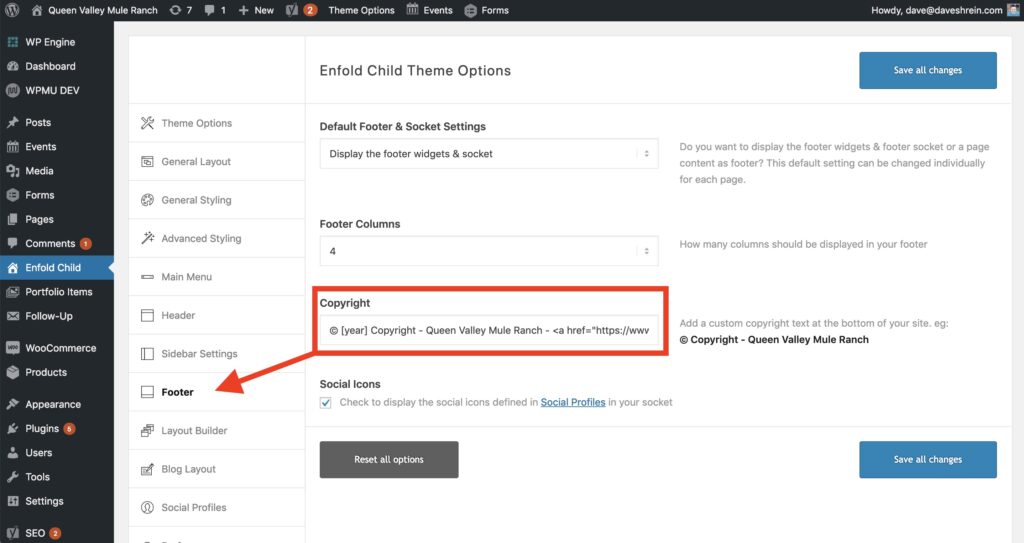
I have hosted a live stream nearly every week for over a half a year with Steve Edwards of Queen Valley Mule Ranch. During this live stream, Steve will mention a product, service, book, video, or any number of other resources. When he talks about a resource, I hop on the internet and find the link.
URL shortening becomes very helpful when sharing long links during live streams, keeping links visually appealing and preventing the chat feed from feeling spammy.
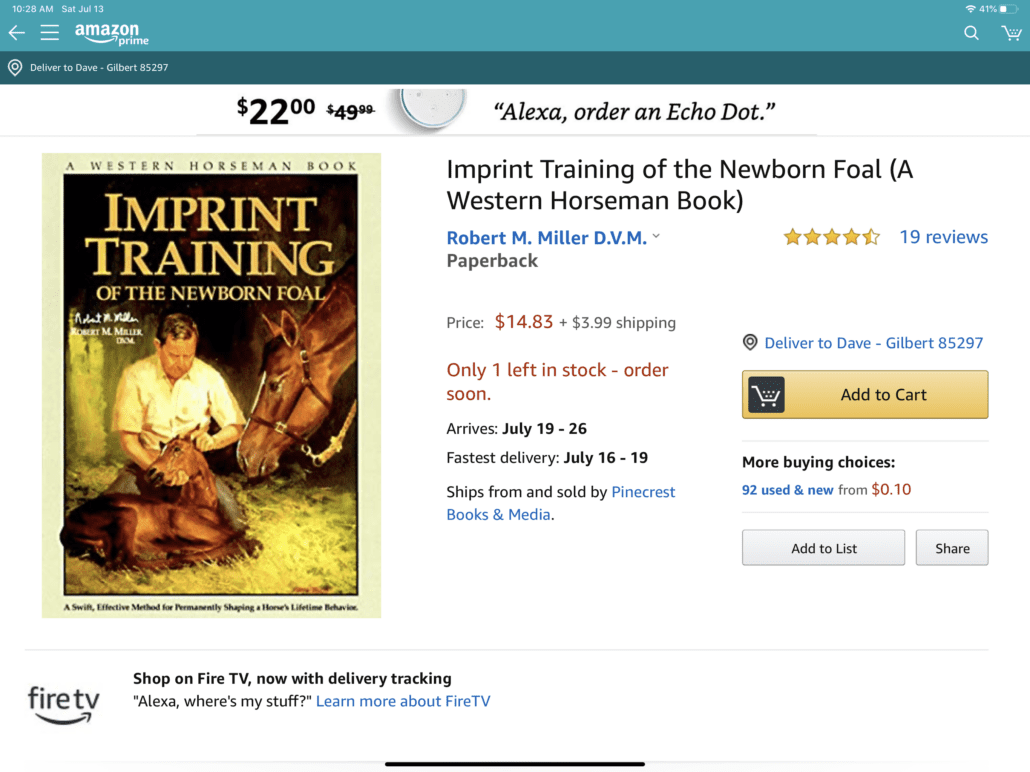
For instance, Steve mentioned Dr. Robert Miller’s book, Imprint Training of the Newborn Foal. As soon as he mentioned it, I went to Amazon to find the link and here is what that link looked like.
Not awful, but certainly not pretty for sharing in the comment section of a live stream. After finding the book on Amazon, I hopped over to a service called Bitly (which we will talk about more below) and shortened that URL to this URL:
Yes, there is a random string of numbers and letters at the end, but overall, the URL is easier to look at, and removes the attention from the URL itself and places it back on the actual item we’re sharing, Dr. Robert Miller’s book.
Amazon has it’s own custom branded URL shortener.
URL Shortener Features
While all URL shorteners effectively do the same thing – shorten long URLs, there is actually quite a variety of additional features offered through URL shortener services and these features are really what separates one service from another.
Custom Branded Short URL
The Amazon URL featured above is an example of the custom short URL — the URL domain is tailored to the Amazon brand, ‘amzn.to’. Another name for a custom short URL is branded short URL because the URL domain is matched to the brand.
A branded URL is a small and very effective way to increase the authority, trust, and legitimacy of your brand. Read our How to Create A Custom Short URL article if you’d like to create your own branded short URL.
Link Analytics and Statistics
While I can’t remember the first time I ever used a short URL, I do remember that link analytics and statistics was one of the reasons I started using them.
Not all, but many URL shorteners provide a varying range of statistics such as basic “how many people clicked this link” stats, visitor referral source (Facebook, email, direct), and origin location for each click.
Statistics and analytics provide greater insight into how your content is performing and what content you may want to amplify and evolve.
Mobile Links
Mobile links have become increasingly important in the last five years as more and more companies launch their own mobile apps.
Here’s how they work.
You receive an email on your phone from a service like Amazon letting you know about a product on sale. You click the link in the email and your Amazon app opens up, bringing the product up on your screen.
The mobile link is what triggers the Amazon app and without it, you’d be referred to the Amazon website through your browser. It may seem trivial, but user experience is increasingly important and for services that rely heavily on a mobile app experience over mobile website compatibility, the mobile link connects the user to the service more quickly and effectively.
While all of the other URL shortener features are still there, some services will use a shortening service specifically for the mobile link feature.
Traffic Routing
While not necessarily an everyday feature, there will be certain times when you may want to direct one user to one page and another user to a different page based on a specific criteria such as user country, user device, language, or other factors.
URL shortener services give you the ability to customize a user’s experience. As is the case with mobile links, it may not seem like an earth-moving feature, but to create a smoother experience catered to a user’s specific need, it is a very important feature.
URL Shortener Integrations
While it may not be immediately apparent why you would want to integrate a URL shortener with other services, as you further develop your content marketing strategy you’ll think up more ways to better represent your brand across every channel and in every location.
Integrating your URL shortener with social sharing tools, email services, and other content marketing tools is a very important feature set that is worth taking note of when you go to select a url shortener service.
Just to provide one example, if you’re using a social media scheduling tool such as Buffer or Hootsuite and want to use your own branded short URL, you will want to make sure that the service you choose has a native integration with the social media scheduling tool you use. Without a native integration, you’ll find yourself doing a lot of manual work or bypassing your shortener altogether.
URL Shortener Services — A Roundup
There is no shortage of URL shortener services. It is a very competitive niche that is evolving every month.
When I first began using URL shorteners in my social media posts, the two options I had to choose from were Bitly and Google’s own URL shortener. Since that time, dozens of services have appeared and Google’s service is no longer a thing.
Below is a roundup of the most worthy players in the URL shortening service.
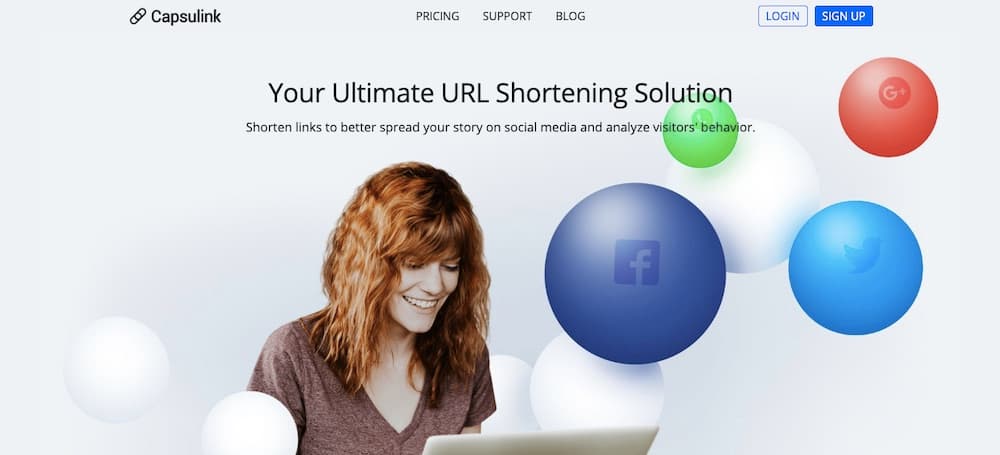
Capsulink
Here is a summary of what Capsulink has to offer.
Key Features Offered by Capsulink
At the time of this writing, Capsulink doesn’t have a features page, but they do list some of the features in their home page copy. Here are those features taken from their homepage.
Broken Link Repair: Empower your short links to never lose traffic.
Branded Domains: Use custom domains to create branded short links.
Analytics: Analytical tools to optimize your marketing strategies.
At the time of this writing, Capsulink does not list or provide information on any native integrations with their service.
Free Plan
Capsulink has a very generous free plan, especially when compared to other services. Here are a few key points of the free plan: unlimited url shortening, basic statistics and 5,000 clicks per month.
One thing to note, the free plan does not include a custom domain for your shortener.
Paid Plans
Capsulink’s entry level plan, the Pro at $5 monthly, includes a single custom domain. All additional features that Capsulink offers are available on the Pro plan minus API access. Higher level plans include higher thresholds for number of custom domains, clicks, smart URLs, etc.
Features found in the paid plans include the following: expanded statistics, editable shortened URLs, password protected links, and default URL modification.
Rebrandly does a fantastic job of highlighting everything offered through their service. You’ll want to visit their features page for a full breakdown of what you can do with Rebrandly. Here are several of their most important features.
Workspaces and Teammates: For larger teams, this gives you the ability to organize and collaborate on large sets of links with different teammates, each one with their own unique access.
Analytics: A UTM link builder baked into the platform, individual link analytics, multiple report options.
Link Management: Editable destination URLs, custom URL slugs, link search, UTM presets, link expiration dates.
Traffic Routing: 301 SEO redirects, link retargeting, open graph control, links with emojis.
Rebrandly’s Native Integrations
This is one of the areas where Rebrandly shines over many of the other URL shortener services. Rebrandly has been very aggressive with building out native integrations and also includes integration with Zapier, which opens up hundreds of additional integrations.
Here are a few of the finer integrations offered by Rebrandly:
Productivity Integrations: Google Sheets Add-on, Slack
Social Media Integrations: Meet Edgar, Social Pilot, Viral Tag, Social Bee, TweetBot
Automation: Zoho Flow, Zapier
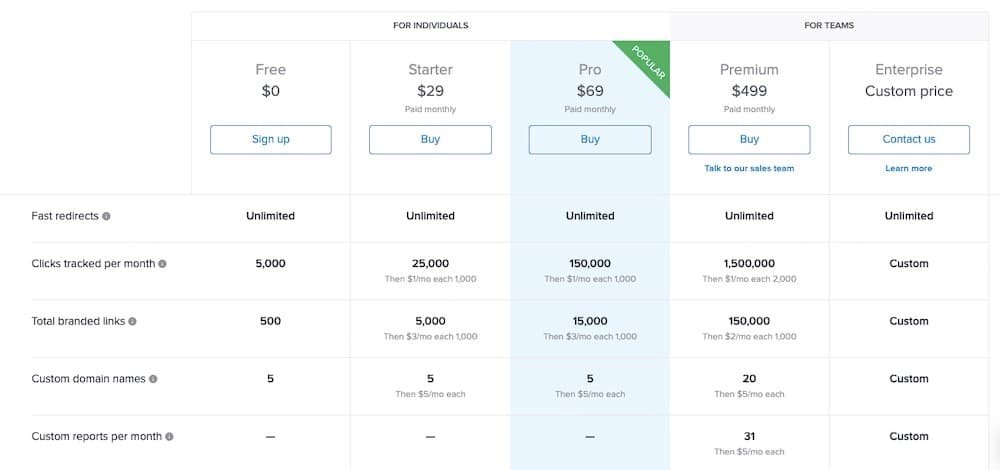
Free Plan
Rebrandly offers a very generous free plan that includes your own custom domain. In fact, you can have up to five custom domains on the free plan and shorten up to 500 links. If all you need is link shortening with a custom domain, the free plan will have you covered.
Paid Plans
The paid plans from Rebrandly are pretty competitive to price points by other URL shortener services and given the expansive features included, Rebrandly comes in at a good value. But just how good of a value? That will depend on which plan you pay for.
Rebrandly’s free plan is more generous than many other service’s entry level paid plans.
The lowest paid plan, the Starter, comes in at $29 monthly. That would seem high, except for the fact that the free plan is actually more feature packed than low level paid plans from other services. Each paid plan escalates the number of branded links you can create, total trackable links, and custom domain names you can use.
Unfortunately, Rebrandly does not make their entire feature set available across all plans. Enterprise features such as teams, API access, and mobile deep linking are only available on their enterprise plan at $499 monthly or via custom plan. Of course, if all you’re looking for is link shortening, this is a non issue.
The Starter plan is $29 and the next and most popular plan (according to their site) is the Pro plan and that comes in at $69 monthly. This plan really does open up the majority of the value Rebrandly has to offer. So while it might be a little more than other offerings, it does come with more value. It just depends on whether or not you need or want to pay the premium for some of the features Rebrandly offers that others don’t.
Bitly is the granddaddy of the URL shortening family. As I mentioned above, it was one of the two services I found when I first wanted to shorten URLs. The primary feature of Bitly is straight up link shortening for free. If you wanted to track your links, you could sign up for a free account, and after a while they allowed free accounts a custom domain.
Their paid plans were almost exclusively for enterprise customers and, if my memory serves me correctly, their plans began at around $1,000 monthly.
Around 2017 or 2018, Bitly made changes to their pricing structure in order to monetize the entry level users and their new paid plan is slightly more generous than their old plan used to be.
Bitly was one of the first tools to offer custom domain URLs and we have a tutorial, How to Create A Custom Short URL, that shows you how to go through the steps of creating your own custom short URL using Bitly
Here is a summary of what Bitly has to offer.
Key Features Offered by Bitly
The biggest value that Bitly offers has everything to do with the fact that they are integrated into everything. Because they’ve been around so long, nearly any service utilizing short urls integrates directly with Bitly, natively.
Aside from the native integrations, the Bitly feature set according to their website includes the following:
Link Shortening: You can use Bitly’s generic link shortener anytime and create an unlimited number of links without an account. If you want to monitor your links, you’ll need an account, free or paid.
Branded Links: You can add one custom domain on their entry level paid plan and if you have a customized plan, you can also have links created by other sites that use Bitly, use your custom domain (very cool).
Mobile Links: Directly route users to the right destination from your mobile communications.
Campaign Management & Analytics: Track and optimize every digital initiative using Bitly’s best-in-class analytics tools.
Bitly’s Native Integrations
Bitly has more integrations than you could ever want or need. Because it’s been around the longest and because it is the industry leader, there is a very high chance that Bitly will integrate with the tools you need to use for your business.
In addition to Zapier, they have a list of Help articles which outline some of the native integrations it offers. Check out Bitly’s integrations here.
Free Plan
As mentioned above, the free plan from Bitly has evolved over the years and is fairly minimal in its feature set and usefulness in its modern form. That said, yes, they do offer a free plan.
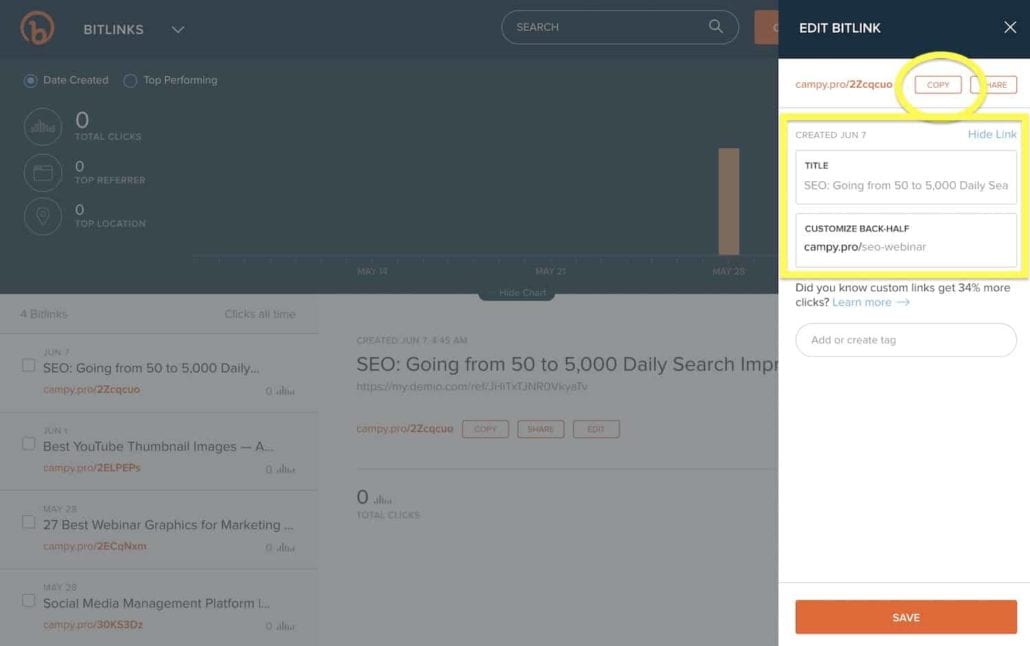
For the free plan you receive 1,000 shortened links, tagging, filtering, and customizing the back half of your links (50 links).
Paid Plan
After years without a consumer or entry level paid plan, Bitly introduced a single paid plan called Basic which is $35 monthly. This paid plan unlocks branded links, a higher number of links per month, and email support. If you have more specific needs or want access to features such as a baked-in UTM builder or mobile deep links you’ll need to contact Bitly about a customized plan.
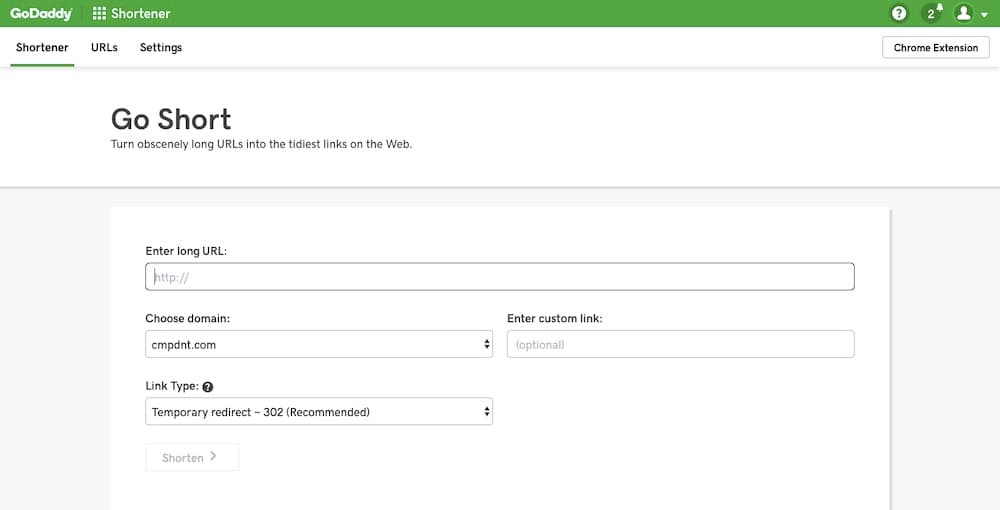
This is a branded domain hidden gem that you have free access to with GoDaddy. If you have a domain that is parked or being forwarded, the GoDaddy Shortener allows you to create a branded URL — you can put that domain to use!
Key Features Offered by GoDaddy
The URL shortener offered by GoDaddy is straight forward — paste a link, choose the domain you want to use to shorten with, create a back half (if you want), and shorten. That’s it!
You don’t have to use your own domain — you can use GoDaddy’s go2l.ink domain or their x.co domain if you prefer.
That’s pretty much all the service offers, which, if all you need is a branded short url, is pretty awesome!
There is a Chrome extension that you can install for easy access to create a short URL — you don’t have to revisit GoDaddy’s website whenever you want to create a new shortened URL. This extension is an exact clone of the website and doesn’t offer anything that the website doesn’t offer other than shortcut access.
Free Plan
GoDaddy’s URL shortening service is free to use with your GoDaddy account — meaning, you need to be logged in to use it. Once logged in, you can create as many shortened URLs as you need (or desire).
Paid Plan
Technically, there is no paid plan for using GoDaddy’s URL shortener. The only ‘purchase’ you need to make is buying a domain to use with the service if you do not want to use GoDaddy’s go2l.ink or x.co URLs.
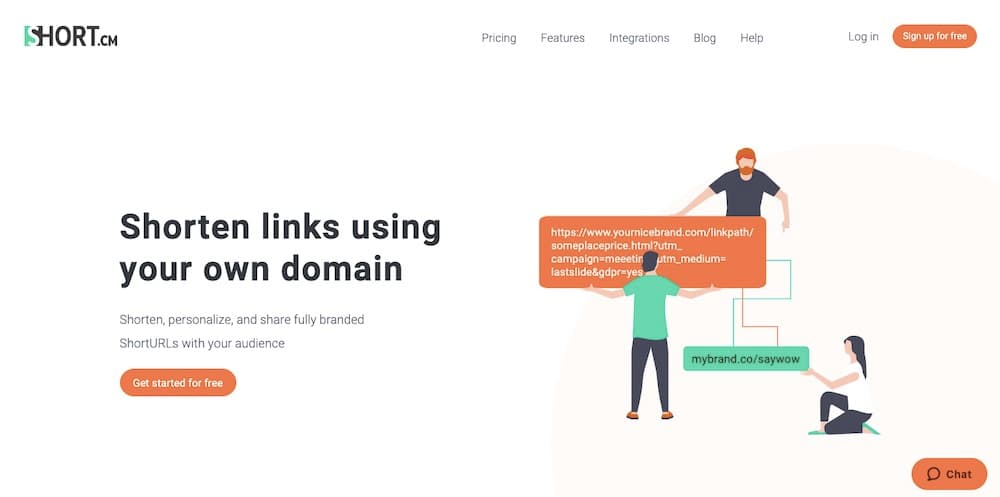
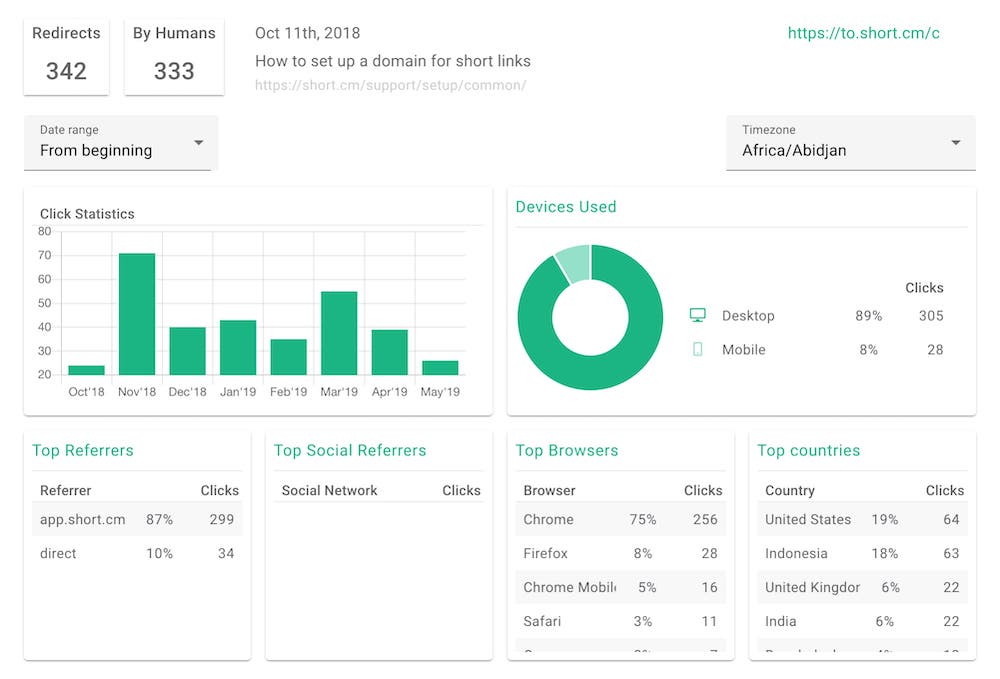
Short.cm gives you access to all of the features you’d expect from a shortening service and in very generous portions. Branded links, manage multiple domains, statistics, roles, tracking, and integrations! Yep, it’s all there.
In browsing their website, the one feature that stood out as particularly useful was the easy-to-interpret statistics dashboard. Short.cm isn’t offering any different or special statistics. They are providing you the same data set that others provide. However, the way they provide them makes it much easier to interpret and understand how your links are performing.
Here is a list of other features offered by Short.cm.
Branded Links: Customize your short URL, the original URL, link title, and manage your tags.
Multiple Domains & Subdomains: Create and manage domain and subdomain URLs.
Team Links: Form a team with a set of domains and group of members with different rights.
Campaign Tracking: Track online marketing campaigns using short URLs. Add UTM parameters to see traffic data in Google Analytics.
Short.cm has an easy-to-interpret statistics dashboard that allows anyone to understand their short link’s performance.
Short.cm’s Native Integrations
This is one area where Short.cm is a little behind when it comes to their peers. Short.cm does offer a Zapier integration which opens up the possibility of integrating with hundreds of apps. As far as native integrations, on their website they list the following:
Zapier
Slack — Create short links right from a Slack channel by typing ‘shorten’.
Segment — Send link statistics with one API to hundreds of tools for analytics.
Google Analytics — Send every click of your short link to Google Analytics.
Facebook Pixel — Retarget ads to people who clicked your short links.
Free Plan
Short.cm’s free plan gives you access to every feature in their “Essentials” feature set. This includes secure SSL, tagging links, QR codes, UTM builder, custom domains, redirects, and tracked links.
When you’re on the free plan you are limited to one user, three custom domains, 1,000 total branded links, and 50,000 tracked links.
If you’re not yet ready to pay for a url shortening service but want to get a feel for all they have to offer, the Short.cm free plan is a great place to start.
Paid Plans
When you decide to upgrade to a paid plan with Short.cm, you get a lot of value. Their entry level paid plan, Personal, is $20 monthly and increases your custom domains to 10, your total branded links to 10,000, and unlimited tracked links. You also gain access to country targeting, link expiration, link cloaking, referrer hiding, and password protection.
Should you want or need more — the next plan, Team, is $50 monthly and unlocks region targeting, deep links, and gives you the option of using a dedicated IP.
Should you need even more — perhaps for a large team, they do offer an Enterprise plan at $150 monthly and that unlocks the remainder of their features, including SSO, multiple teams, and other enterprise features.
Cuttly is a very interesting service because it is 100% absolutely free.
Cutt.ly lets you understand more about click-through of your links. We give you a huge marketing tool with advanced URLs tracking system for free without any hidden commitments. Why? Because we believe that the best things should be free.
Now, I’m not a lawyer, but I can read — and after going through their terms and conditions, it does appear that they really are giving away the service for free. Things can always change, but for now, it appears it is not too good to be true.
As I used the site more, I did see some ads which makes sense — they have to pay for their resources somehow.
Key Features for Cuttly
Cuttly offers everything that you would want. The best part (aside from the fact that it is free) is the interface is clean, straightforward, and easy to use.
Custom Domains & Branded: Use your own domain for your links. While it’s not clear if there is a limit to how many domains you can use, you can have multiple custom domains.
Customize Link Back Half: Change the url after the domain extension and backslash.
Link Statistics: See how your links are performing based upon total clicks, source of clicks, device information, browser information, and geographic location.
Cuttly’s Native Integrations
Integrations is where Cuttly may not be a viable solution for some. While Cuttly does offer API access, they do not integrate with any other software, tools or platforms — not even Zapier.
Because GoDaddy does not offer any type of integrations or stats, Cuttly still is a good solution if you thought the only bummer about GoDaddy was lack of link tracking. Cuttly definitely has link tracking and statistics.
Watch our short demo of Cuttly.
Free Plan
The only plan offered by Cuttly is a free plan which gives you unlimited access to all of their features. The website is banner ad supported and they do have an affiliate partnership with an eco friendly hosting company which has a presence throughout the platform.
Still, the free plan is equal to or better than paid plans provided you’re okay not integrating with other tools.
As mentioned at the beginning of this article, many services use their own custom short URLs which negates many of the needs to shorten them. A few services you will notice using their own branded URL include:
Twitter: Every link shared on Twitter, including links in Direct Messages, are shortened using Twitter’s URL shortener, http://t.co link.
Amazon: Links shortened on Bitly will convert to Amazon’s amzn.to URL and links created via Amazon’s affiliate program, as well.
Spotify: Links shortened on Bitly will convert to Spotify’s spoti.fi URL.
These are just three examples of links you’ll find are auto shortened when shared online.
Final Thoughts On URL Shortening Services
The best takeaway regarding URL shortening services is that there is a good fit for nearly anyone and nearly every use case. What’s more, URL shortening services have come a long way in regards to what they can do beyond just making links pretty.
The best way to choose the right URL shortener for you is to identify exactly what you need the tool to do and then find the service that does it at a cost that fits within your budget.
If you have any question about integrating a URL shortening service into your workflow, send us a message or leave a comment below. In some cases we may be able to provide quick feedback and in other cases we may redirect you directly back to the service’s support.
We want you to feel equipped and empowered to create content marketing campaigns that convert for your business, increase leads, and grow your sales! Anyway we can help, let us know.
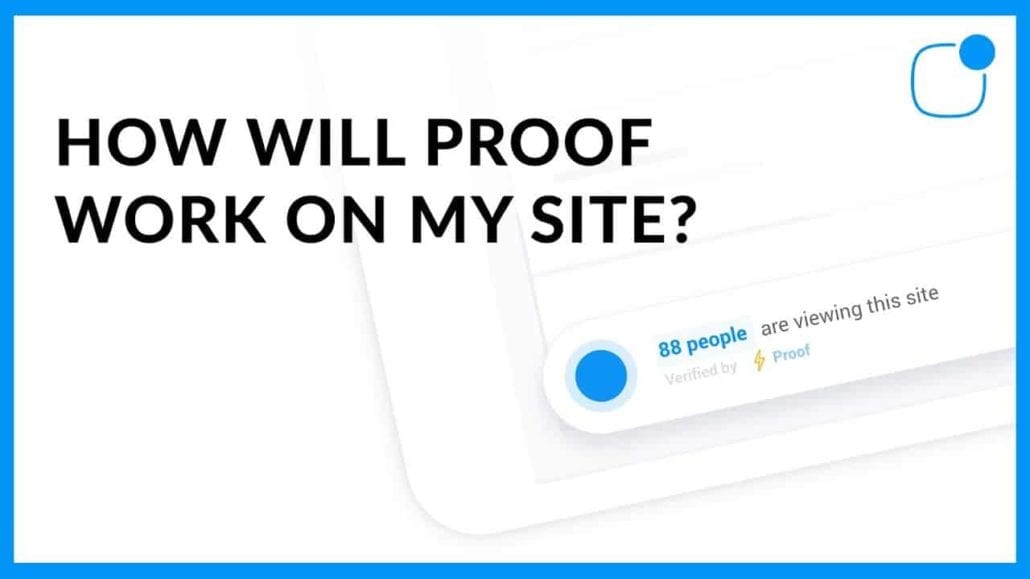
Social proof notification popups are being used on more and more websites as part an increase in growth marketing tactics. Maybe you’ve called them social proof ads or social proof marketing messages — regardless of what you call them, brands are using them and in great abundance.
You’ve seen these notifications across popular SaaS and e-commerce websites informing you that other individuals just like you are engaging with the service or product that you’re currently viewing.
We use social proof notifications for Campaign Donut as a way to get our free resources and upcoming events in front of new visitors who may not be aware of what we make available.
Social proof notifications are a great way to get specific information in front of users who are not familiar with your brand — WHILE creating trust between you and new users.
Learning how to use and integrate social proof notifications throughout your website is pretty straightforward and is something that nearly anyone can do.
Honestly, the hardest part of using social proof notifications is finding a service that meets your needs and your budget. There are all sorts of social proof apps and social proof softwares available, but which is right for you?
You’re in luck… helping you find a service that meets your needs and budget is what this post is all about!
How to Make Marketing Popup Notifications Work for You
The great thing about nearly every social proof app we include in our round up is that the notifications look good right out of the gate. You don’t need to make any changes or customizations to your notifications to have them look good on your website.
In addition, each service provider does a good job providing starting text for your notification. Maybe you’ll make a small tweak to the wording here or add a title there, but for the most part, you’re ready to publish within minutes of creating your account.
However, most people will want to go beyond using everything straight out of the box — you will, no doubt, want to make language and design changes to better integrate the marketing popups into your brand. So, in order to make social proof marketing work for you, here are a few suggestions regarding design, language, and integrations.
Design Your Social Proof Popups to Be On Brand
There are three elements to nearly every social proof notification: color, icon, and shape. Keeping these three elements consistent across all your social proof marketing popups is essential to finding success with social proof notifications.
Customizing Colors for Your Notifications
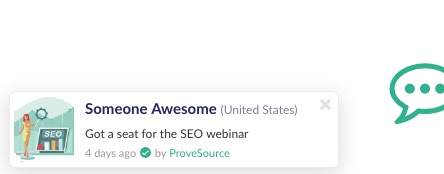
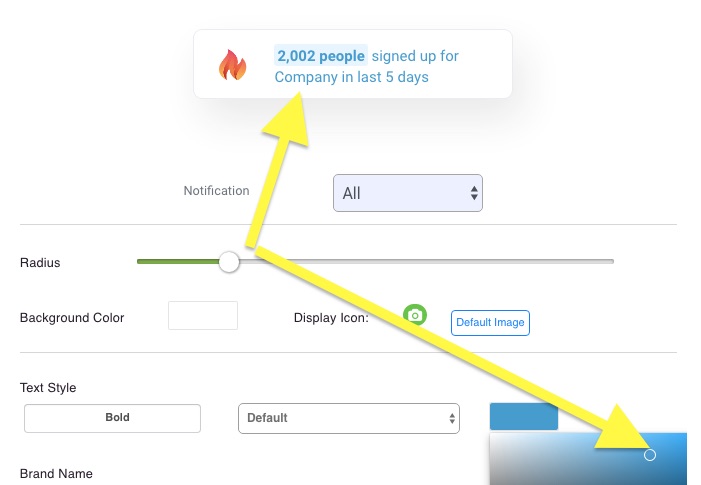
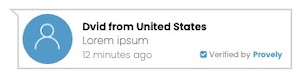
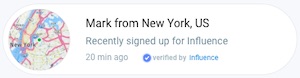
In regards to injecting color into your design, each social proof app will have different elements you can change color for. For instance, in the screenshot below we have customized the color for the name title and the Prove Source branding. The message text and the time stamp text is not editable.
Prove Source allows you to customize the color of the name and the Prove Source branding.
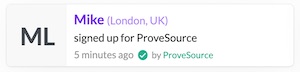
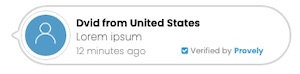
Take a look at a social proof example from a different service — instead of being able to customize the count and the text separately, all the text shares the same color.
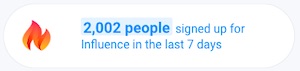
Using the influence Bulk Activity live count notifications, all text shares the same color.
When choosing colors for your notifications it is important that all the colors be consistent across all notifications. Stick to a specific combination of colors — one primary, one accent, and one font color. Using different shades of colors throughout all your designs will lower brand consistency which in turn diminishes trust.
Selecting Icons and Images for Your Notification
Not all, but many social proof softwares will allow you to upload icons to your notifications. The default image is often a map or generic avatar — uploading icons allow you to inject your brand into the design and tighten up the overall brand experience on your website.
As great as being able to upload icons and images is, it can go sideways really quickly if the designs do not compliment the brand as a whole and are mismatched from one another.
At Campaign Donut we chose to have a set of custom icons created and we used those icons for our notifications to maintain consistency with our overall brand.
Should you choose to use your own icons and graphics on your notifications, use a family of images that are visually consistent with each other.
If you do not yet have a set of icons that you rely on for your brand, here are several places you can find large families of icons that will work for your brand:
Each social proof app will offer their own collection of pop up shapes customizations. The two most common shapes across all software developers is the rounded shape and the squared shape.
Some apps will have variations of rounded and squared. Some will allow you to choose the overall border radius. Whatever you choose, make sure to stay consistent across all your notifications. Using the same shape across all your notifications will create a stronger visual brand which will increase trust and brand value.
Social Proof Marketing Integrations
Integrating your social proof notifications into your current marketing stack is incredibly important — capturing conversions and sending live data updates to the notifications popping up on your site is the life-blood of the entire social proof notification concept.
The more integrations, the better — however, it is important to understand the crux of how most services will capture conversions and turn them into a popup.
The standard way of capturing data for a social proof notification popup is done with a small snippet of code placed on the same page as the capture form. This small snippet of code latches on to the form, captures the fields provided, and sends that data back to the service app and then uses that data to produce the notification popup.
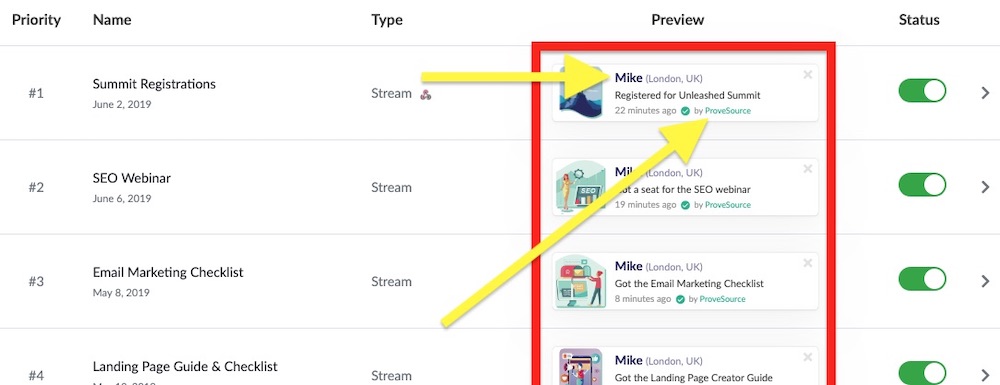
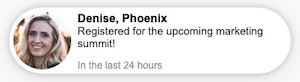
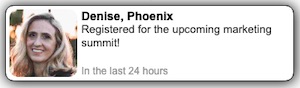
For instance, you are running a webinar and you want to show a social proof notification on the registration page saying “Bob has registered for the SEO webinar” to encourage other visitors to register as well. In the header code of your registration page, you would place the small snippet of code to capture the name and location data of the person registering.
Once installed, the tracking code will pick up the name and location for every individual who registers for that webinar. The data will be sent back to the social proof app, and the app will push a new notification to the page or pages of your website where you want the notification to appear.
All but one of the services included in our roundup utilize this method of capture which works for any website where you have a form as well as the ability to inject code into the header of the page.
Social Proof WordPress Plugin
If you’re using WordPress you may be wondering, “Is there a social proof WordPress plugin I’ll need to install?” and the answer is maybe. Many social proof app developers will offer a WordPress plugin to either make installation easy for everyone and/or provide a deeper integration into the website itself.
It is worth noting that there are standalone social proof WordPress plugins that offer marketing and social proof without a third party service — however you must be using WordPress for them to run which means you won’t be able to integrate them into any website pages hosted outside of your WordPress install.
For this article we’re covering only third-party services because of their ability to integrate across all platforms including Shopify, Squarespace, Leadpages, Clickfunnels, and more.
Additional Integrations Beyond Form Capture
Beyond using the pixel method to capture submissions, there are direct integrations you may want to take advantage of, especially if you are using a shopping cart service.
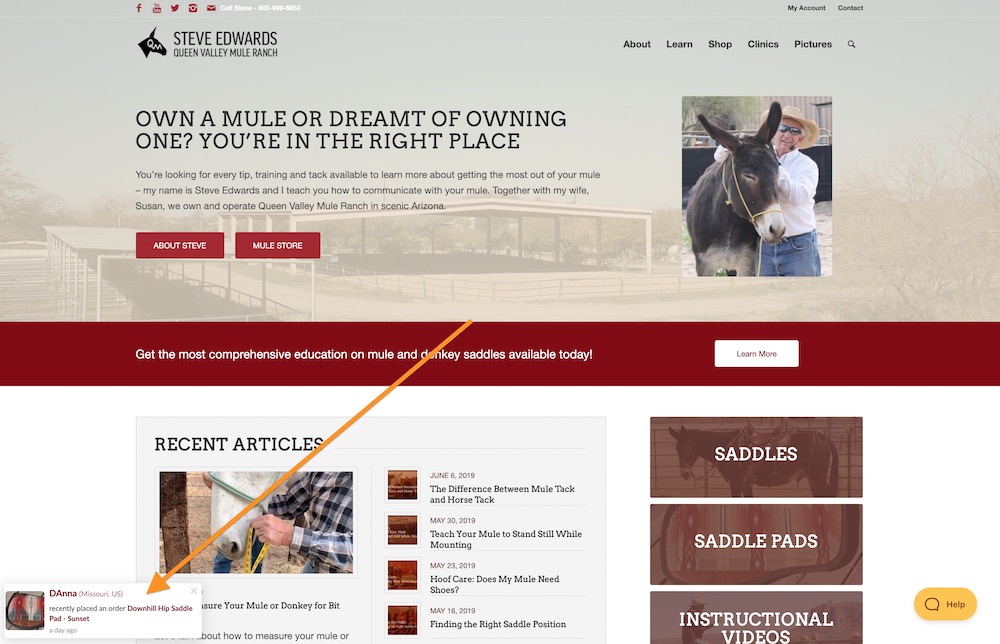
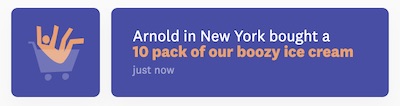
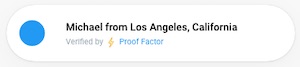
For instance, a WooCommerce, Shopify, or Magento integration will not only generate a marketing notification saying “Bob from Phoenix just completed a purchase.” — it will also allow you to send more specific data to the popup such as what you see in the image below “Danna (Missouri, US) recently placed an order Downhill Hip Saddle Pad)”.
When you integrate your social proof notification service directly with a shopping cart, you can provide product specific information on orders that come through.
Beyond shopping cart integrations, you will want to consider additional integrations such as reviews (Google, Facebook), payment processing (Stripe), analytics (Google, Segment), email marketing service (Mailchimp, Drip, ActiveCampaign), and CRM apps (Pipedrive, Agile CRM).
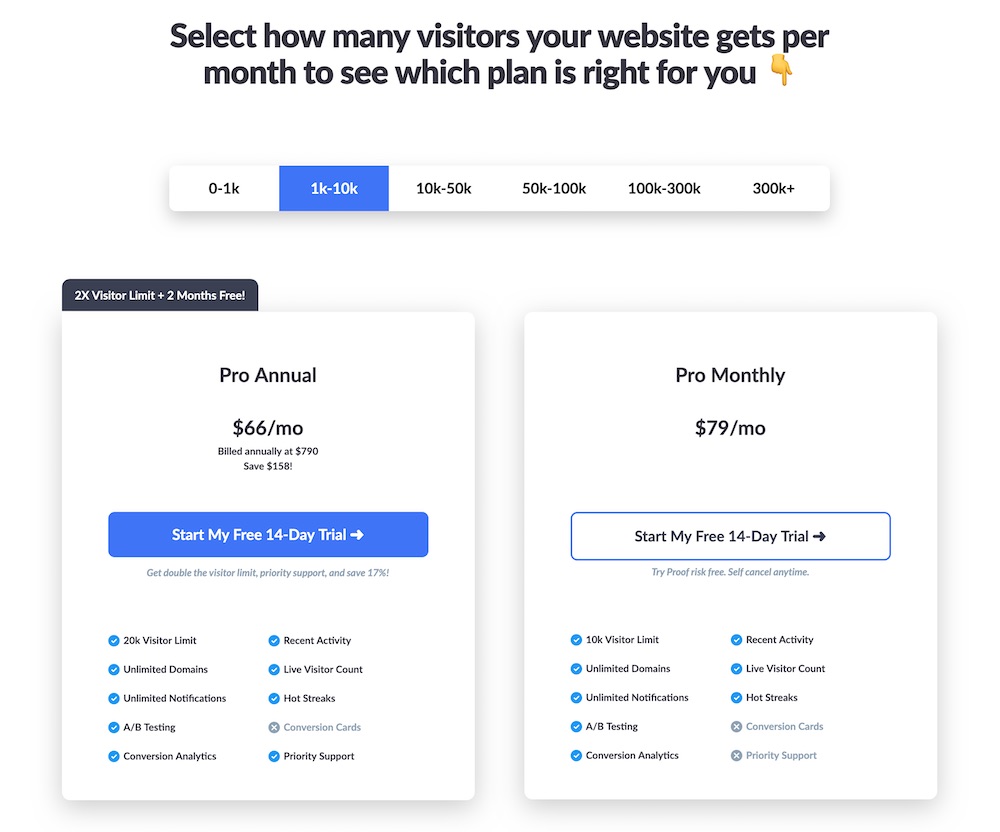
Major Differences In Social Proof Notification Pricing
The primary pricing differentiator for all services we cover includes the ability to remove branding and total number of visitors per month to see your notifications. You will find there are other variables that may appear in different plans, such as dedicated support agent and number of domains you can install the service on, but visitor count and branding are the two big ones.
In almost all cases, you will have access to all features but will pay for a larger plan if you need more visitors. So, you may have access to activity notifications and live count notifications in a starter plan, but you’ll need a larger plan if your site visits exceed 1,000, 10,000, even 50,000 visitors in a one-month period.
When it comes to branding, you’ll find that these social proof apps will allow you to remove branding once you pay for a second or third tier plan. NOTE: Even in cases where your plan would allow you to remove branding, retaining the third-party branding provides an important and valuable ‘verified’ impact — increasing the trust and authenticity of the conversion.
Retaining the branding from your social proof service acts as a non-bias, third-party verification and can increase trust in the conversion and your company.
Personally, the reason I appreciate having the verification on my notifications is because I do not want to be accused of using a fake social proof plugin where I can create false registrations and conversions. Of course, there are always methods for working around this, but for the Campaign Donut brand, we want to do things the right way and build strong trust. We say “no” to using fake social proof plugins.
While there may be some cases where removing the branding is desirable, there are still many applications where it is advisable to retain the branding — especially if it can be customized to match the look of your site.
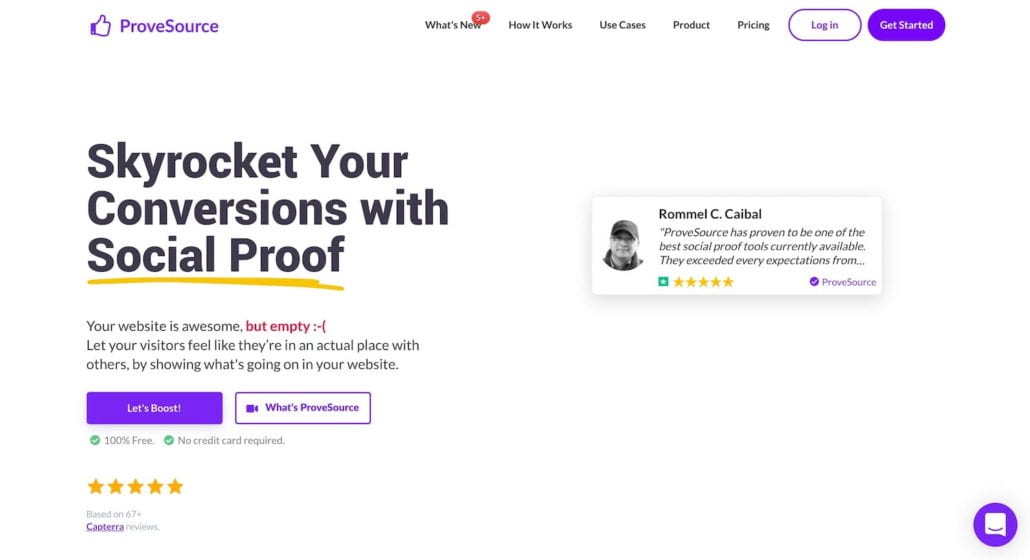
ProveSource | Skyrocket Your Conversions with Social Proof
Types of Notifications Available with Prove Source
Stream: The Prove Source Stream notification is the baseline notification that reports the actions individual people have taken on your website related to a specific conversion: signups, registrations, purchases, etc.
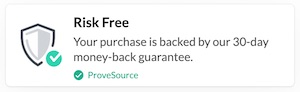
Informational: The Prove Source Informational notification allows you to present arbitrary information to your visitors such as guarantees and security statements.
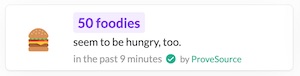
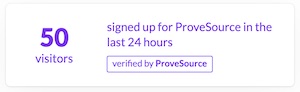
Counter: The Prove Source Counter notification provides cumulative counts for recent actions taken on your website including how many visitors your site has had, how many purchases have been made, number of registrations, or how many current visitors are on your website.
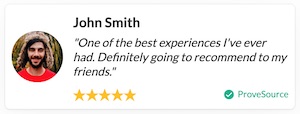
Reviews: The Prove Source Review notification pulls a stream of individual reviews from Google, Trust Pilot, and Reviews.io.
Combo: The Prove Source Combo notification is similar to the Counter notification but is cumulative counts over a specified period of time.
Prove Source has a single notification widget style that is apparent across all notification types. There are small customizations allowed to each notification within the single style — but having the single style keeps brand uniformity in tact.
Biggest Advantage of Prove Source
In addition to offering multiple variations of notifications (listed above), Prove Source is incredibly easy to use. Minus some getting familiar with the terms and overall functionality of social proof notifications, Prove Source is intuitive and makes creating your first notification easy.
When you create your notification, Prove Source takes you through six steps to launch the notification live on the website. Each step is straight forward and the constant preview in the lower lefthand corner of the screen shows you exactly how your changes will look once the popup is live on your website.
Prove Source provides a variety of customizations from messaging, to icons, to colors. You can dial in almost any look you want using Prove Source.
In addition to the step-by-step prompts, each field inside each step is labeled, clearly informing you as to what each field is responsible for and educating you on the app’s capabilities.
Biggest Drawback of Prove Source
Prove Source provides few native integrations with its platform, relying on webhooks and third-party integrations to feed information to each notification. While not a huge deal, this does mean that either the platform you want to feed notifications from will need to work with webhooks or have an integration with a tool like Zapier.
Despite the limited integrations, Prove Source’s pixel code functions like most social proof apps and actually captures the user’s form input on the page where they take action. All you need to do is tell Prove Source which URL you would like to track actions from (be it filling out a form or otherwise) and then customize the message for that action. Prove Source will do the rest.
Prove Source Free Trial
Prove Source does not offer a “Free Trial” so-to-speak — rather they have a limited free plan available as well as a 14-day money back guarantee on their paid plans.
The free plan allows you to create one notification and limits you to 1,000 monthly visitors (which means your notifications can be seen by a maximum of 1,000 devices). The free plan does not allow for you to customize the branding of the Prove Source popup.
Should you want to have complete control right out of the gate and be able to create multiple notifications, they offer a money back guarantee.
The team from Prove Source has proven (no pun intended) to be reliable and helpful.
Prove Source Social Proof Notification Pricing
The pricing plans offered by Prove Source are very competitive, if not disruptive.
Next to the free plan, the lowest plan option from Prove Source is the $19 monthly Starter Plan and gives you access to all social proof marketing features, unlimited notifications, allows for 10,000 monthly visitors, but limits your ability to remove the Prove Source branding.
After the Start Plan comes the Growth Plan at $49 monthly and removes branding limitations and increases visitors to 50,000 monthly visitors. At this point, you have access to everything Prove Source has to offer.
Their Gorilla plan, which is the highest plan (before their unlimited option), is $199 monthly and allows for 500,000 visitors per month. This is where Prove Source is really disruptive. This same plan can run twice, even three times as much on other platforms with similar features, making Prove Source a great value.
Fomo | Social Proof Marketing Platform
Fomo is a very popular social proof notification popup option. On our agency side, we have actually used Fomo for clients. There is a lot to like about Fomo, including nearly all features available at the entry level plan.
Fomo handles notifications differently than most of the social proof apps. Instead of creating a notification to display, Fomo integrates with services and generates notifications based upon the events which are pushed from the services to Fomo.
Fomo does utilize the form capture option described above — but the strongest customizations come through their direct integrations.
Examples of Fomo Notification Popups
The design of each Fomo widget definitely has a distinct look unique to Fomo. While many other services parody one another, Fomo’s native styling is different and has a branded flare to it.
You can choose the single style you’d like to use in Fomo’s Theme section and once selected, you can customize the padding, text color, and link color of your notification in addition to dialing in specific CSS rules you’d like to apply.
Biggest Advantage of Fomo
Fomo allows for a lot of customization to your notifications. From colors, to images, to fonts, to merge fields — you can do A LOT to dial in your notification to look, feel, and say exactly what you want. As of this writing, they offer seven different notification popup templates.
Fomo also has A LOT of native integrations. Whereas some social proof popup services will claim “thousands of integrations” delivered through third party tools, Fomo offers direct integrations with dozens of popular services.
Biggest Drawback of Fomo
Fomo is complicated to use. It probably didn’t help that a great deal of their support documentation was out of date and referencing an old user interface. The documentation being out of date required us to constantly seek help directly from their team which slowed down our ability to implement even the simplest changes.
While our email provider was supported natively, to dial in popups for specific actions taken by our users inside of our email system, we needed to contact support to have those notifications configured.
If we had more patience to become Fomo experts there would definitely be a lot to enjoy.
Fomo Free Trial
Fomo does offer a 14-day free trial. After signing up for the free trial, we were given access to their Essential plan.
Their support was great when our account was live and when it was time to cancel our account, there were no problems.
Fomo Social Proof Notification Pricing
Fomo is on the more affordable end of the spectrum, given that their essential plan has access to all features minus A/B Split Testing and API Implementation Support.
The main difference between the plans is how many notifications you’ll be allowed to display per month. As of this writing, the Essential Plan runs $39 monthly and includes 50,000 notifications across unlimited domains.
The middle tier Plus Plan is $79 monthly and includes 250,000 notifications per month.
Finally, the third and highest tier is the Advanced Plan which provides 3,000,000 notifications per month plus API Implementation Support, Managed A/B Split Testing, and Optimization Support. The Optimization Support costs $29 for users of other plans and is described on their website as the following service: “For a $29 one time fee, our team of technical support engineers will personally inspect your setup and implement improvements to help you get the most of Fomo.”
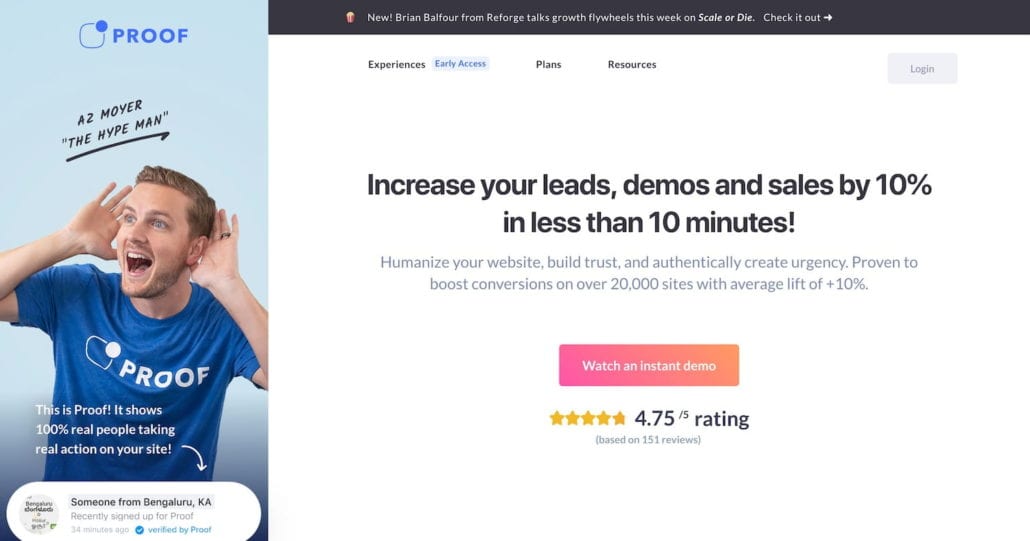
Proof | Increase Website Conversions With Social Proof
Proof was the very first social proof notification service we tried at Campaign Donut. It has an “industry leader” feel to the brand, the product interface, and the actual notification itself. Nearly everything about Proof feels polished and professional, making it a great option for getting started with displaying social proof marketing notifications on your website.
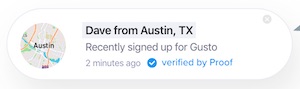
Activity: The Proof Activity notification is the standard feed of showing an individual user’s specific conversion action. This is the feed to show a registration, lead generation, purchase, or other individual action.
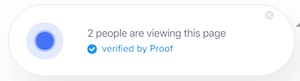
Live Visitor Count: The Proof Live Visitor Count notification is a cumulative count on current visitors on a particular domain or a particular page.
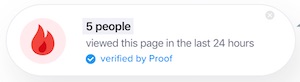
Hot Streak: The Proof Hot Streak notification shows how many cumulative actions were taken by all users for either page visits or conversions in a 24 hour time period. For page visits, you can either select specific page visits or page visits across the entire domain. For conversions, the notification will specify how many users completed the specified goal for the campaign.
Conversion Card: The Proof Conversion card allows you to send an informational prompt, void of any metrics, encouraging users to take a particular action.
Examples of Proof Notification Popups
Each Proof notification widget maintains a consistent Proof style across the entire line. Aside from customizing the message, there are two overall ‘looks’ you can choose from for your widget: rounded corners or boxy corners. There are no color customizations (that we could find) and there are no style customizations (outside of the corner selection).
Biggest Advantage of Proof
The biggest advantage of Proof is they are viewed as the industry leader. How is that an advantage? They continue to innovate and come up with new ways to leverage the in browser proof notification for marketing.
The entire concept of social proof notifications is simple and each service delivers an end result that is almost identical to what you could get from another service — Proof separates itself from parody by innovating.
In the last year they’ve added split testing and goals — two items that other companies have since copied to their own platform.
After using Proof for nearly a year, it was clear they were committed to evolving their platform and adding new experimental features.
Biggest Drawback of Proof
If you’re looking for a drawback of Proof, the pricing will certainly give you a reason for pause. Their pricing is, by far, the most expensive for the social proof app space.
While many services will offer a free plan or an entry level plan in the teens, Proof starts at $29 monthly for their Basic Monthly plan. In addition to being a more expensive entry level plan, they also strip out a considerable number of features, reserved for their Pro and Business plans. They also limit the number of visitors to 1,000 which is on par with other free plans.
When we first began using Proof, configuring our notifications was very simple and easy to customize. With the introduction of Goals and A/B Split Testing, the process became confusing because of compulsory nature of these new features.
In an effort to provide more evidence to customers that Proof helps increase conversions, it is now mandatory to create a goal and run A/B Split Testing.
When we went to create a new notification that could not be tracked using their goal feature, we were still required to create and associate a goal — no way around it. After speaking with support we discovered that we could choose an arbitrary goal just to get past the screen. Once past, we were required to run an A/B Split Test. Even though we could make the decision to send all traffic to our Proof widget, the interface still showed A/B Split Testing, which was aggravating since we did not want to run a split test.
It is worth underscoring that their team is super responsive, very kind, and was receptive to the feedback we provided about the service being priced too high.
Proof Free Trial
Proof does offer a 14-day free trial for all of their plans.
Their support has always been responsive and quick to reply, helping you make the most of your free trial.
Proof Social Proof Notification Pricing
As mentioned above, Proof is expensive. After your free trial expires, you’re looking at $29 monthly. On the Basic Plan Monthly you receive 1,000 visitors per month and do not have access to Live Visitor Counts, Conversion Cards, Hot Streaks, or Priority Support (thought it’s not clear what the difference is between priority and standard support).
Proof provides an increase on your visitor limit when you pay for an annual plan.
The next pricing point is their Pro Plan which is $79 monthly. When you choose this plan, you receive 10,000 monthly visitors, Live Visitor Counts, and Hot Streaks. Unfortunately, you will still not have access to their entire feature set: Conversion Cards are reserved for the next plan.
The third pricing option is the Business Plan which is $129 monthly. On this plan, you finally receive access to all features and 50,000 visitors per month.
Beyond the Business Plan, each step provides additional visitors — no additional features. Their top monthly plan is $299 and includes 300,000 visitors.
Purchasing any plan on an annual basis does provide a slight cost reduction.
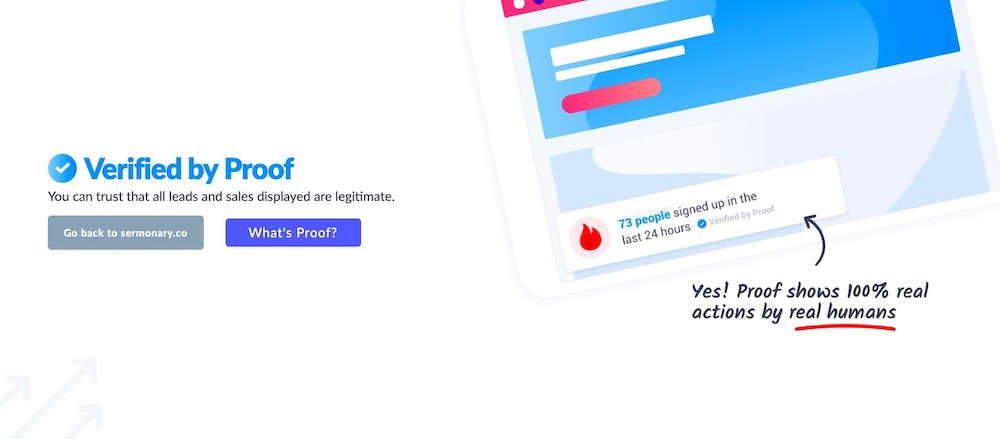
One notable item missing is the ability to remove or customize branding. When you search their help center for the option to remove branding, they do offer to remove branding for those on the Business plan and higher — though it has to be done manually and is either an all or nothing proposition.
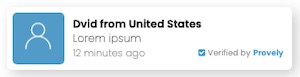
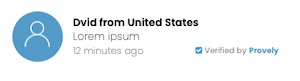
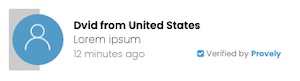
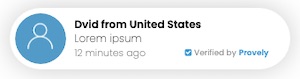
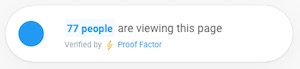
We actually don’t mind leaving the Verified by Proof branding, especially because when users click on the link they are taken to a page that explains what “Verified by Proof” actually means. It is a nice marketing touch that we haven’t seen anywhere else.
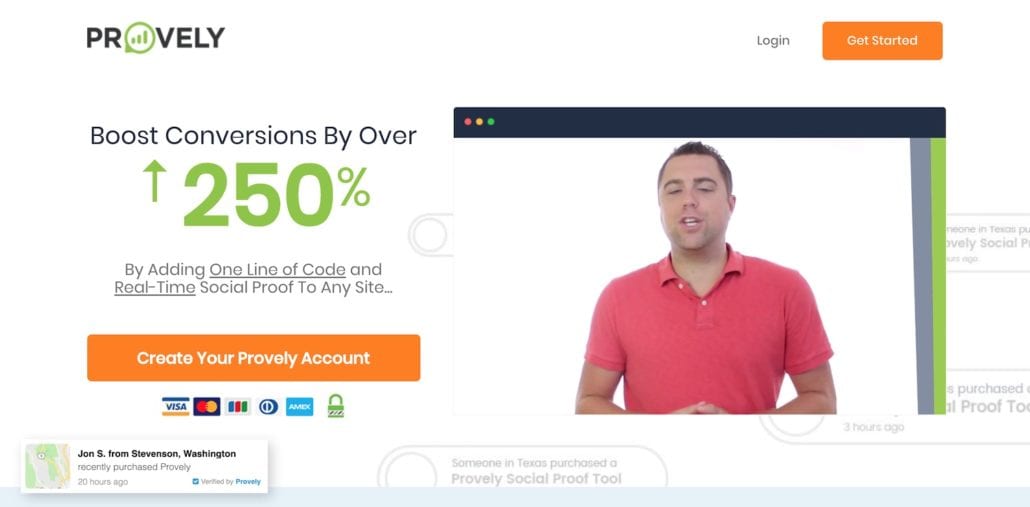
Provely | Boost Conversions Adding Social Proof to Any Site
Provely is a unique option when compared to the other services listed in this rundown. Nearly all services allow you to display your notifications across all websites, Provely separates its three plans by defining the number of domains on which your notifications can appear.
Another point of difference is that Provely does not limit visitor counts for your account — which is something other services will charge $799 monthly and higher to enable.
Provely offers only the conversion/activity notification. While creating your conversion notification, there is an option to enable Live Counters within a conversion/activity notification — but live counters are not available on their own.
Examples of Provely Notification Popups
Provely offers seven different notification base designs. This is more than any other service we’ve profiled. Beyond selecting your base design, you are able to customize the color of the name, text, time stamp, and select either map icon or generic avatar.
Biggest Advantage of Using Provely
The price point plus the unlimited visitors is the clear advantage Provely has over their competition. While other services may have a low price point or offer unlimited visitors, there are no other services that offer both disruptive pricing plus unlimited visitors.
The unlimited visitors feature may not be as important for individuals using Provely’s single domain plan (after all, many websites don’t eclipse 50,000 monthly visitors — much less, 10,000), however, for those who are using social proof ads on multiple websites (and for clients), the unlimited visitor feature will be ideal.
Biggest Drawbacks of Provely
The impression Provely created with its website is largely confirmed immediately after purchasing Provely and then using the app. I would describe the overall experience as “unpolished” and shifty.
Immediately after signing up for Provely, you’re presented with two additional opportunities to spend money. This is pretty typical for info products but feels a little unscrupulous for a software product. These bump and tripwire offers left me wondering if Provely is a legitimate software company.
Once you log into the website, the process of creating your notification feels unpolished and clunky — as if there wasn’t much thought put into the workflow experience and it was built just to function.
For some, this may not be a drawback. However, after interacting with other services for the purpose of writing this article, the Provely interface feels like a dramatic downgrade.
Provely provides a large selection of notification designs, but the customization to those designs are minimal, including limited options for fonts and images.
All that said, the functionality is there, the product works, and Provely delivers exactly what it claims on the sales page — how it delivers on its promise leaves something to be desired.
Provely Free Trial
Provely does not offer a free trial, but does provide a 30-day money back guarantee. We signed up for their smallest plan to check out the product and when we requested a refund they provided it the same day.
Provely Social Proof Notification Pricing
The pricing for Provely is very straightforward and very affordable. The differentiator between each plan is the number of domains you can install their social proof app on.
The least expensive plan, Basic, is $17 monthly and allows you to run Provely on a single domain.
The second plan, the Pro, is $27 monthly and allows Provely to run on up to five domains.
The third, and most expensive plan is the Ultimate which unlocks all domain restrictions and allows Provely to run on as many domains as you’d like.
There is an approximate 50% discount for purchasing Provely annually and with a 30-day money back guarantee, it’s a great way to try the product and secure great savings!
Morevago | Display Reviews, Build Trust, and Get New Customers
Morevago social proof notification services focuses their attention on displaying reviews as the primary driver of social proof for customers. Unlike the other social proof apps featured in this round up, Morevago does not automatically capture your conversions or track your site activity in real time — you manually add your reviews and notification content to each campaign you’d like to run.
Morevago offers one type of notification called a Sticky Review. What makes the Sticky Review unique is that you can customize the individual item to say whatever you would like. So while technically speaking you only have one notification available, in theory you could create an unlimited amount of notification types by customizing the Sticky Review to suit your needs.
Examples of Morevago Notification Popups
There are five designs to choose from with the Morevago service — and with each campaign you can customize the notification background color, heading color, and text color.
Because Morevago chooses to handle the individual notifications, Sticky Reviews, separate from campaigns, this means that you can apply one Sticky Review to multiple campaigns and each review you use will take on the unique design traits of each campaign.
Unfortunately, when you’re designing your campaign notification style, there is no preview of your work — you have to wait until the changes are published to view them on your website.
Biggest Advantage of Morevago
Being able to create a custom stream of unique reviews and notifications and assign them to a myriad of campaigns is a capability not offered by any other service we’ve tried. To be able to create a notification that brings in your best reviews from all across the internet — including email and chat bot messages — is incredibly valuable.
Also, the ability to run a single “Sticky Review” across multiple campaigns could be very useful in some circumstances.
Biggest Drawback of Morevago
Originally, we were going to list the biggest drawback as not automatically capturing new conversions as they happen or bringing in reviews when they’re published to various reviews sites — however, since this is what makes Morevago uniquely different, we couldn’t list it as a drawback.
The primary drawback with Morevago is a lack of savvy and artistic design. This drawback applies not only in the app experience itself, but also the individual notification designs.
Looking at the same notification styles below, there is a clear drop off in quality of design.
The entire design is lacking which will diminish the ability to brand your notifications and take more time to dial in those which you would choose to use. Still, for some the ability to custom create notifications will be a great benefit and shouldn’t be removed as a reason to overlook the design shortcomings.
Morevago Free Trial
Morevago does offer a 14-day free trial by providing a credit card during sign up. Once logged in, it is very easy to cancel your account without needing to contact customer support.
Morevago Social Proof Notification Pricing
There are only two differences between Morevago plans: number of domains and removable branding. The entry level pricing for Morevago comes in at $14.99 monthly for what they call the Starter plan. This plan does not include the ability to remove the Morevago logo and limits your notification installation to a single domain.
The second plan is the $19.99 Plus plan which allows you to use Morevago on a single domain like the Starter, but with Plus you can remove the Morevago logo.
The Premium plan is the third tier and is $29.99 monthly, providing you with the ability to install Morevago on up to 5 domains.
The final plan listed on their site is the Agency plan which is $197 monthly and allows for you to install Morevago on unlimited domains.
Proof Factor | Free Plugins to Increase Your Conversions
Proof Factor feels like a straight-forward social proof app right from the moment you first arrive on their website. The middle of the road pricing with robust feature set makes Proof Factor a strong value. Proof Factor goes one step further than other competitors by introducing exit intent triggers and interactive gaming into the experience.
Types of Notifications Available with Proof Factor
Proof Factor is limited to two notifications and what they call the Fortune Wheel Email Pop Up.
Recent Activity: The Proof Factor Recent Activity notification is for displaying the individual conversions you want to track and report on. This would be your email opt-ins, sales, and registrations.
Live User Count: The Proof Factor Live User Count notification shows a cumulative number for how many users are currently visiting a specific page or specific website.
Aggregate Visitor Count: The Proof Factor Aggregate Visitor Count notification shows how many visitors have viewed a specific page or specific website within a specified period of time (hour, day, week, month).
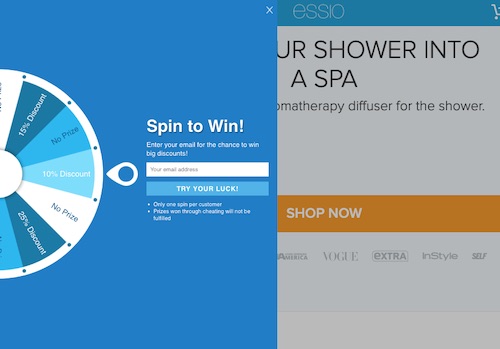
Fortune Wheel: The Proof Factor Fortune Wheel is an interactive game popup that uses a “spin-the-wheel” style of game to entice users to signup or purchase your products.
Examples of Proof Factor Notification Popups
Proof Factor offers two design options for their notifications: rounded and squared. In addition, they provide you with the ability to add custom CSS to change the notification appearance to suit your tastes. This would include changing colors for background, border, text, as well as link.
Biggest Advantage of Proof Factor
When you compare all the social proof notification services to one another, there is one major advantage of Proof Factor over the rest of the competition — the Budding Entrepreneur plan.
This plan is 100% free, gives you access to the entire suite of products and allows for up to 1,000 visitors per month. What this speaks to is the overall value provided in Proof Factor. Whether you are just testing an idea or have a solid product ready to sell, you only pay when you use their platform beyond the 1,000 visitors.
What’s more, Proof Factor’s system is very easy to use so you’re not sacrificing functionality for cost — you can log in and create high end notifications easily, right away!
Biggest Drawback of Proof Factor
It’s difficult to find any drawback of Proof Factor, especially with a very generous free plan. The one area there could be growth would be in the overall design options for notifications. There are really only two options — rounded and squared. While it’s nice to have CSS to play with, if you’re uncomfortable editing CSS, you’ll find the color options easier to work with using other apps mentioned in this list.
Still, if you can live with the minimal design options, Proof Factor offers great value.
Proof Factor Free Trial
As already stated, Proof Factor offers something much better than a Free Trial — a generous free plan.
The Budding Entrepreneur plan is free to use and the only limitation in terms of feature set is a maximum of 1,000 visitors per month. They do note that free plans get Live Chat Support, however, the paid plans receive higher levels of support.
Factor Proof Social Proof Notification Pricing
After the Budding Entrepreneur free plan comes the Small Business plan which is $29 monthly. This plan increases your monthly visitor count from 1,000 to 10,000 unique visitors. The Small Business plan comes with what Proof Factor calls “Premium Support” though I am not sure what that includes.
The third tier plan is the High Traffic Site and that increase your visitor count all the way to 50,000 per month and includes what they call “Elite Support” again, not sure what is included in Elite Support that isn’t included in Premium Support.
Finally, there are three plans that Proof Factor calls “Larger Plans” and those range in price from $179 monthly to $429 monthly. All Larger Plans receive “Dedicated Support Team” and include 100,000 to 500,000 visitors monthly.
The value of Proof Factor pricing is really seen in the Small Business and High Traffic Site plans.
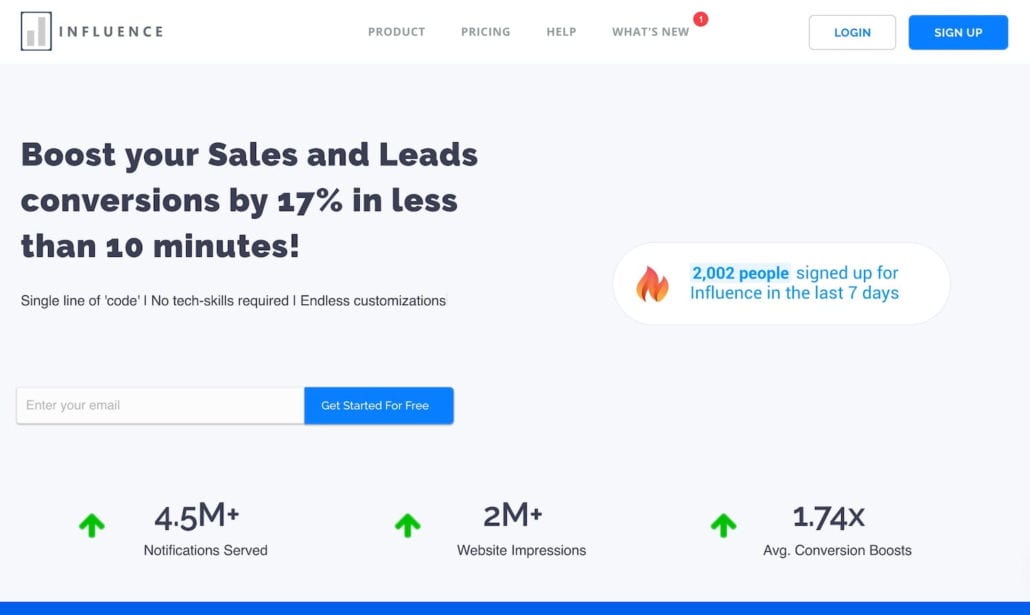
Influence | Increase Conversion Rate by 17% Using Social Proof!
Out of all the services I’ve included in this round up, Influence is the newest. In spite of being the newest, it actually has a lot going for it and, in some ways, is ahead of other services which have been around much longer. Influence includes access to all the standard notifications you would expect from a social proof notification service and has several additional features in the works (not live as of this writing) that could catapult it past competitors.
As of Summer 2019, Influence has three active notification types. When configuring a campaign, they have an additional three notifications in development which look intriguing and, quite honestly, exciting!
Bulk Activity: The Influence Bulk Activity notification shows the number of total signups for the campaign over a specified period of hours or days.
Recent Activity: The Influence Recent Activity notification shows the individual conversions for the campaign.
Live Visitor Count: The Influence Live Visitor Count notification displays the total number of visitors across the website. This notification can also be configured to display the number of live stream viewers on the site.
Review Notifications (Coming Soon): The Influence Review popup will allow you to show customer reviews through social proof notifications. There is no information on whether this is automatic or if reviews will need to be entered manually.
Custom Notification (Coming Soon): The Influence Custom Notification popup is described by Influence as having the ability to “show custom content” without any additional details.
Push Notifications (Coming Soon): It is not yet clear how the Influence Push Notification feature will work or what it will do. When I reached out to support, they didn’t provide any additional info.
Examples of Influence Notification Popups
The notification design styles available from Influence are very simple and largely mimic what we see from other social proof apps. With each notification you have the ability to customize the radius of the corners, allowing you to make them rounded out or squared.
Biggest Advantage of Influence
There is a lot to love about Influence, including the pricing. The biggest advantage I see with Influence is how easy it is to use. Since it’s a newer company, there are some interface design tweaks that should be made, however, overall it is straightforward and easy to figure out.
A second advantage is that Influence appears poised to grow beyond simple notifications — which could be a good thing or bad thing in the long run, depending on how their wide feature set impacts overall development of core features. However, it will be interesting to see how it plays out.
Biggest Drawback of Influence
If you’re looking for a reason not to use Influence, the biggest drawback in my mind is that it is very new and there may be a lot of uncertainty around it’s long-term viability.
Other concerns that come with a new company is a lack of support documentation. When setting up my first campaign I couldn’t find explanations for certain features in the knowledge base, leaving me to rely on chat support. Chat support was speedy — though it appears there may be a language barrier to overcome when chatting with support in the future.
There are dashboard design tweaks that I’d like to see, tightening up the UI with better color selections for borders, fields, text, and other UI elements — but I suspect these will come.
Influence Free Trial
All plans from Influence are available as a 7-day free trial. Seven days is a bit short, especially if you are wanting to measure conversions to decide if Influence moves the needle for your business — 14 to 21 days would be preferable, however, having a free trial at all is still nice.
Influence Social Proof Notification Pricing
Influence has four plans shared on their website — for larger plans than what is listed, you can contact them directly. There are three differences that separate plans: visitor count, removable branding, teammate accounts. Teammate accounts are essentially additional users able to access your account and make changes based upon the permissions you’ve assigned. After your free trial, you will land in one of the following plans.
The first and least expensive plan is called the Startups plan, it comes in at $15 monthly and provides you with 10,000 visitors per month. The second plan, the Growth plan (50,000 visitors), is $39 monthly and both the Startups and the Growth plans do not provide you with Teammate Accounts and you are unable to remove Influence branding.
The third and fourth plans, Advanced $65 monthly and Enterprise at $189 monthly, are identical except for visitor counts. Advanced provides 100,000 visitors per month and the Enterprise provides 500,000 visitors per month. Each of these accounts offer Removable Branding and Teammate Accounts.
Additional Social Proof Notification Services to Consider
New services continue to pop up across the web, each one offering unique and distinct benefits, separating themselves from other services.
Here is a list of additional services you may want to check out in your quest to find the right social proof notification app for your business.
Final Thoughts On Using Social Proof Marketing Notifications
Just because you can use social proof notifications on your website does not mean that you should. It really depends on your brand story and the relationship you have with visitors to your website prior to them making any type of a purchase.
For small e-commerce sites that are largely unknown and potential customers wonder, “Can I trust this company?” social proof marketing makes sense.
For the large software business that is well-established and has a strong relationship with their users prior to any type of financial transaction, it could feel gimmicky and even over the top.
Be sure to think through how your target audience will respond to notifications and try to anticipate what impact their response will have on what they believe about your business — from there, you should be in a good position to make a decision.
If you have any questions about adding a social proof app to your website, or how to best use the notifications for your brand, send us a message or leave a comment below. In some cases we may be able to provide a quick solution, in other cases we may redirect you to the app’s support.
In the end, the entire team at Campaign Donut is here to empower you to create content marketing campaigns that convert and however we can help make that a reality for you, we’ll stand ready to act!
“How do I get a cool custom short URL like I see other brands using on social media?”
Something you don’t pay attention to when you first start sharing your content on social media is the actual length of the URLs you are including. As time goes by, you become more aware of how important presentation (uh hem, branding) is and start taking notice of how ugly your URLs actually are.
They are not pretty. They are too long. What can I do about this?
Once it is on your radar you start noticing that other users are sharing links but they are coming from bit.ly or buff.ly or rebrand.ly. The tools that create these pretty links are called URL shorteners — and they do exactly that, shorten the URL.
And Then You See A Short URL That Is Custom
Among all the generic links that come from these URL shorteners, you will notice that some users have unique URL shorteners that appear as if it were made just for them.
And you’d be right — these are called custom short URLs or a branded short URL.
In this article we will take you through the steps necessary to setup your own custom short URL using a service called Bitly. We’ll use pictures and specific instructions for every step in the process and when we’re done you will have your very own custom URL.
Who Is Using A Custom Short URL
Years ago I spotted my first custom short URL. It was from Michael Hyatt. I actually thought it was so cool I took a screenshot. I immediately wanted one.
Michael Hyatt is the first person / brand I noticed using a custom branded URL.
Hyatt has been a mega-blogger for years initially I thought, “that’s probably something only the ‘big guys’ have access to.”
Shortly thereafter I noticed that Buffer had their own. I took a screenshot of their Tweet, too.
Buffer has their own branded URL, buff.ly.
Seeing two brands using their own branded short URL, I started to scroll through my feed looking for other brands using a custom short URL. Once I started looking, they were everywhere!
After a little bit of research I discovered that anyone, in fact, could have their own branded short URL, including you!
Beyond the visual appeal, there are a lot of features custom short URLs offer which can enhance your overall marketing efforts — not just your brand appearance. Dustin Stout has a great breakdown on custom short URL benefits along with a very in depth tutorial on maximizing Rebrandly.
Selecting Your Desired Custom Short URL
When you’re choosing a domain for your primary website it is always preferred to find a .com or .net address. When choosing a domain for your custom short URL, it really doesn’t matter what domain extension you use. The only preference is to find one that’s short. An extension with 2-3 letters is preferable.
Visit a domain registrar (in this example we’re using GoDaddy) and start searching for the domain you want to use.
Use your preferred domain registrar to buy the domain you will use for your custom short URL.
As you scroll through all the options and recommendations, you are looking for a domain similar to your brand but shorter. For example, Michael Hyatt’s website is michaelhyatt.com and his branded URL is mhyatt.us.
When setting up Campaign Donut’s URL, we went through dozens of options and even more searches. Many of the domains we wanted were already taken. We eventually settled on the domain campy.pro, a nod to the first name we ever had for Campaign Donut.
Find a short URL that you’re comfortable with and buy it.
Select a shorter version of your brand name for your custom short URL domain. You may find the best options are taken — keep searching and get creative.
Once you have purchased your new domain, it is time to integrate the domain with a URL shortening service.
Select A URL Shortening Service
Today, you have more choices than ever when it comes to selecting a service to hand your URL shortening. Here are five URL shortening services that give you the ability to create your own branded URL:
There are two things you want to look at before choosing your service:
Will the plan I choose meet my needs.
Will this service integrate with the tools I already use.
At Campaign Donut, we chose Bitly because of the second need — it was the only option that had a native integration with several key services we use.
Third-party integration tools like Zapier can help you get around the lack of native integration with some tools — others, you’ll want native integration.
How to Setup Bitly Custom Domain, Step-by-Step
Bitly has been around for a long time (in URL shortening service years) and offers a limited free option for a custom branded url.
If you already have a Bitly account, go ahead and log in as usual.
If you do not have a Bitly account, you can sign up for free and then proceed to complete the steps to connecting your custom branded URL.
Login to Bitly or sign up for your free account and verify your email address.
Once you are logged into your Bitly account select the account details button from the upper right hand corner to reveal account details sidebar menu.
Click the account preferences button in the upper right hand corner of bit.ly and a menu will slide out from the right.
From the account preferences menu, click on the ‘Manage’ text to reveal the Account Details option. Click on the ‘Custom Domains’ tab. Click on the ‘Add Custom Domain’ button from the upper right hand corner.
The ‘Add Domain’ menu will appear and you’ll now receive instructions from Bitly on how to update your domain’s DNS to connect Bitly to the domain itself. The two records you will need to create are:
A record = 67.199.248.12
A record = 67.199.248.13
(The records Bitly provides you may be different than the records we were provided in this example.)
In the white box at the bottom, ‘Custom Domain’, type in the domain you purchased. Do not click verify just yet — proceed to the next step below.
Update Your Godaddy DNS Records
Keeping the Bitly ‘Add Domain’ window open, return to your domain registrar (we used Godaddy) and access the domain DNS records.
Delete any current A records and then add the two A records as shared in the Bitly instructions, saving each.
The instructions from Bitly assume you are using a domain that is not currently in use. For instance, we would not update ‘campaigndonut.com’ to be our short URL because it is already in use. We purchased a new domain to serve as our short URL domain. If you would like to make changes to a domain currently being used to any extent, make sure you know what you’re doing before you make changes.
Add two individual A records, each one pointing to one of the IP addresses bit.ly provides.
After deleting any previous A records and adding the two Bitly URLs, it may take a few moments for the new settings to take effect. Still, you can proceed to the next step.
Verify Your Bitly A Records
Return to the Bitly ‘Account Details’ page and click Verify. If Bitly cannot verify the records right away, wait a few minutes and try again. It may take up to 30 minutes for all settings to populate across the internet in order for Bitly to see you’ve updated your A records.
In some cases it may take a domain registrar up to 24 hours to propagate the DNS record adjustments across the internet.
Bit.ly provides two individual IP addresses that you must create two A records to point to individually and add your custom domain in the bottom box.
Once verified, refresh your browser and navigate back to the Menu>Settings>Advanced Settings section. Confirm that your new domain is the default domain for your shortened links.
After you verify your domain you need to navigate to Bitly settings and configure your new domain as default for link shortening.
When you are able to select your newly configured domain as the default domain for Bitly, that indicates you have successfully setup your custom short URL. You can now begin using Bitly to shorten your URLs with that domain.
Using Your New Bitly Custom Short URL
When you’re ready to create your first link, return to the Bitly dashboard and click the ‘Create Bitlink’ button.
Return to your Bitly dashboard and create a new Bitlink.
The Bitlink meny will slide in to view on the right side of the screen to reveal the ‘Paste Long URL’ option. Once you paste your URL, in a matter of milliseconds, Bitly will automatically create the link. If for some reason Bitly doesn’t automatically create the link, press the ‘Create’ button at the bottom of the screen.
The Bitlink menu slides in from the right (on desktop) to reveal the “Paste Your Long URL” field. Paste your link there and either click the Create button at the bottom or wait approximately 3 seconds and bit.ly creates the link for you.
After creating the new Bitly, you have several options in the updated sidebar window.
Paste your long url and click the Create button.
Copy: Click the copy button to copy the new custom short URL to your clipboard. You can proceed to paste the link whenever you wish.
Share: Bitly has built in configuration with Twitter and Facebook. You can connect your social accounts to share directly from Bitly.
Title: Using the title field you can customize the title that will appear when sharing on social networks or anywhere preview snippets populate.
Customize Back-Half: This option allows you to change the preassigned Bitly URL. Bitly assigns a string of random letters and numbers and Customize Back-Half allows you to change that with something more intelligible.
Copy your custom short url from bit.ly and share!
What If I Run Out of Branded Links?
You might be wondering, “Is there any reason for me to use a bit.ly link rather than my custom short URL?”
In the past, Bitly allowed you up to 500 branded URLs per month. Currently, the free plan allows you only 50 custom domain URLs and 1,000 shortened URLs total. If you’d like more URLs, you can upgrade to one of Bitly’s paid plans, starting at $29 per month.
Another service we recommended above, Rebrandly, provides a much more generous free plan with 500 custom domain URLs and up to 5,000 trackable shortened URLs. Unfortunately, Rebrandly doesn’t integrate with some of the services we use — hopefully you’ll have more luck.
When You Should Use A Branded URL vs Standard URL
With a limited number of branded URLs available, you may be wondering if you should still use a bit.ly domain. Here are two suggested use cases where you may consider the bit.ly domain.
You use your account to create a short URL for a friend, family, or a customer and do not want it to carry your branding.
You want to shorten and track a URL that is not associated with your business brand.
Otherwise, it is the best practice to use your branded URL for your business. It looks professional, it is consistent with your overall brand, and it will be an eye-catching URL when shared outside of people in your network.
No longer will you be the one noticing the fancy short URLs all the ‘big guys’ are using. As small is a custom short URL may seem, it will have a big impact on how people view your brand on social media, especially if it is just one part of a strong brand you are working hard to develop.
Final Thoughts On Creating Your Own Branded URL
If you have any question about using Bitly to host your custom short URLs, choosing at domain to use for shortening URLs, or applications for your short URL, send us a message or leave a comment below. We want to be helpful and make sure you keep out of the marketing muck to keep moving forward and convert like crazy! If we can help, we will.
Looking for the best YouTube thumbnails? Wanting to find inspiration to create your own custom thumbnail designs? You’re in the right place!
Creating custom thumbnails is not only a great way to elevate your brand as a whole, but it’s also a way to influence viewers to choose your video out of all the options available. No, a custom thumbnail will not make your content better than it is so it’s important to focus on creating quality content — but the thumbnail will help your AWESOME content get noticed!
In truth, we started down this trail when creating our own video thumbnails for Campaign Donut. We wanted to provide our design team with examples of what engaging YouTube thumbnails looked like. In the end, our first design turned out a bit different thank much of what we saw and that was entirely because of the type of content we were serving up in our initial videos.
You can see our final thumbnail design at the end of this article.
Creating Great Thumbnails for YouTube Videos
As mentioned above, you want your thumbnails to be branded and engaging. There are a few common traits we identified in the YouTube thumbnails below.
Brand Colors
Large Text
Obvious Primary Object or Subject
Minimal Words
Dynamic Images
Custom Backgrounds
In addition to these traits above, it was also clear that creating cutouts, or masked images, of the primary subject was very a popular design choice for those who have the time, money, staff, or skill necessary to pull it off.
What Makes YouTube Thumbnails Important
Designing images for YouTube is much different than designing for a social network or create webinar promotional images. Why? Because your brand will be sharing real estate with dozens of other brands. Check out the image below.
Out of all the information available to you during a YouTube search, the element that receives the most real estate is thumbnail.
The thumbnail, by far, is the element that draws the most attention without even looking directly at it. Also, notice what is getting the most real estate? The thumbnail.
As you explore the collection of video thumbnails we put together, remember that it will be important to make your thumbnail design your own. Don’t put pressure on yourself to duplicate a design perfectly or to get your graphic just right.
The best news is that you can always go back to any videos in your library and update the thumbnails in the future if your custom YouTube thumbnails don’t turn out to be exactly what you wanted.
Not all brands go out of their way to get creative with their YouTube thumbnail design. Actually, the majority of channels we looked at while trying to find great examples of YouTube Thumbnails, those channels didn’t do anything at all — they didn’t even select a unique thumbnail.
These examples below show several channels that utilize very simple thumbnails with one or two elements to comprise their designs.
In contrast to many of the examples above, we took a more “instructional” approach to our YouTube thumbnails. The videos we were creating were more about providing a specific solution to a specific problem — rather than discovery.
Here are a few examples of instructional video thumbnails that you can use for inspiration if you’re considering the same approach to your videos.
After taking a look through the designs above, you should have a few ideas for your design. Some of the examples, such as the ahrefs designs, are more advanced than others and you may want to enlist the help of a designer if you are to pull off those designs.
Something else to consider is the scaleability of your designs. In other words, will you pursue a design that is more templated that requires you just changing out background, text, and colors or will you pursue a design that will require a professional illustrator to create new designs? The NBA designs are a good example of templated designs that are easy to reproduce. Anyone with basic design skills can easily create new templates with updated content. The thumbnails from Justin Brown will require completely new designs and updated masked images to keep up with over the months ahead.
At Campaign Donut we have a full time design team that can produce anything we need. However, we didn’t always have that luxury. Prior to our team, we enlisted unlimited graphic design services that helped us handle new design mock ups and overall production. If you are not a designer and you do not have your own in-pocket designer, give unlimited graphic design services a look.
Final Thoughts On Custom Video Thumbnails
If you have any question about creating your own custom thumbnails, creating thumbnail design templates, or enlisting design services to help create your thumbnails, send us a message or leave a comment below. Sometimes all you need is another brain thinking through what you’re working on — other times you just need a specific answer to a specific problem… either way, we’re here to help!
Unlimited graphic designs services have become more and more common. Choosing the right service to partner with will provide great value to any company not ready to commit to a full-time designer—but is ready to stop fiddling with free graphic design tools.
For the longest time graphic design was a premium service but with the arrival of do-it-yourself graphic tools, design and illustration has become a commodity.
Just because you can create your own business graphics doesn’t mean you should. If you’re not an experienced graphic designer you could actually do more harm to your brand than good when you try to be a business owner and graphic designer.
Unlimited graphic design is a double-edged sword. On one side, you can spend a few hundred dollars each month to get unlimited graphics sent to you within 24-48 hours (in most cases). On the other side, this small step up in design may be a giant step up for your company, however, it doesn’t mean that the design will do any better promoting and marketing your brand.
In this post you will discover exactly what you need to know about unlimited graphic design services, how to ensure you get the most for your money, and go through a roundup of options, evaluating the pros and cons of each service (as represented by the features and pricing on their website).
What You Need to Know About Unlimited Graphic Design
Does unlimited really mean unlimited? Yes and no. When a company offers unlimited design, what they are really offering is unlimited design at a rate of one design at a time. This means that if you request 10 project designs at one time, any work done on the second design will only begin after work is completed and approved for the first design.
You can request 200 designs in one month, but depending on the speed of the service, the complexity of the project, and number of revisions needed, you may only expect to receive 10-30 designs in one month.
This limit on unlimited design provides a method for different companies to differentiate themselves from competitors as well as differentiate their own pricing tiers. For those services that offer multiple pricing options, you can expect to receive multiple tasks at one time.
While the service is technically unlimited, the production you can expect will not be.
The Difference Between Graphic Design vs Graphic Production
This flood of unlimited graphic design services launching since 2015 has underscored the need to know the difference between graphic design and graphic production.
So, what is the difference?
Graphic design is the art of strategically combining color, shape, depth, texture, text, and photo into a visual representation of what you want to say to the world. The key word in the previous statement is strategically.
Today, anyone can use free graphic design tools or inexpensive illustration programs to produce graphics of all types. This is where we get to graphic production.
Graphic production is the process of arbitrarily combining design elements to produce a graphic that fulfills a request. Instead of designing with the end goal of effective communication, graphic production is designing with the end goal of producing a graphic.
When choosing an unlimited graphic service it is important that you understand there is a good likelihood you are going to be receiving a graphic production service – not true graphic design.
At Campaign Donut, we’ve noticed that the quality of the final design depends less on the company you choose to go with and more upon the designer you are paired with. In addition, you can expect a higher quality final design if you provide a higher quality design request to your designer.
If your designer understands design tools, pays attention to detail, and you can provide them with a clear set of instructions you can expect a greater level of satisfaction in the end results.
Unlimited Design Service Turnaround Time
Being paired up with a skilled designer is imperative for success when using any unlimited graphic production service.
The second most important element to success is turnaround time for your requests. The faster you can expect your design request to be fulfilled, the faster you can provide feedback. The faster you can provide feedback the faster you can expect to receive your finished design. Obviously, a faster turnaround means more designs per month.
As you evaluate different services you’ll discover that it is pretty standard to see a promised turnaround time of 24 hours to three days. Don’t be surprised to find some services list their turnaround time as long as five days.
As much as a 24 hour turnaround time sounds great, our experience shows that you really shouldn’t expect consistent 24 hour turnaround unless the following criteria is met:
The request is for a simple, single image (social media, article featured image)
You have provided clear instructions for the designer to follow
The design service queue is not backed up
Your request is not coming just before the weekend
In the world of unlimited graphic design services your best approach should be to consider a 24 hour turnaround for a perfect design to be the exception – not the norm.
Even though unlimited graphic services will advertise 24-hour turnaround, you rarely will get a finished and ready-to-use graphic in 24 hours. Be prepared to wait 48-72 hours for a final product that you can use.
Evaluating A Graphic Design Service Portfolio
If you’ve given any thought to paying for unlimited graphic design, you’ve probably gone straight to look at each individual service’s portfolio.
Reviewing the portfolio of each unlimited graphic design service you are considering is very important. The portfolio gives you an idea of what you can expect in your designs. There are several things you want to pay attention to in the portfolio examples.
Are the Designs Original Or Do They Have A Stock Feel?
Prior to the rise of unlimited graphic design services was the rise of graphic templates. A large collection of graphic template sites popped up, providing you with a Photoshop file for a logo, flyer, quote graphic, handout, presentation graphic, and many other popular graphic elements.
Many graphic design services utilize stock imagery and designs. This is okay, just make sure that your end design matches your style, not a template or stock style.
Our team has actually purchased and used many of these templates over time.
In exploring the portfolios of each service, it has been a common occurance to notice popular templates from these graphic template stores appear in the portfolios of individual unlimited graphic design services.
This isn’t necessarily a bad thing — templates are actually quite helpful, especially when you don’t want to (or need to) create a specific element from scratch.
The thing you want to pay attention to when exploring these service portfolios, is do the individual graphics feel like they are unique and original to the companies they are representing or do they feel like that have a generic sheen over the top?
It is OKAY for any designer to use graphic templates. Product mockups alone could take hours, if not days, to build from scratch. Just make sure you’re comfortable with the various styling of the service before you buy in.
Do the Colors In the Design Compliment Each Other?
Color matching is pretty easy for graphic designers because when they are working with businesses that have a set of colors assigned to their brand.
As you look through service portfolios, If you notice odd color combinations or color combinations that are weird that is a very good sign that an individual service it may not be the service for you. These are examples of ‘their best work’ and if they can’t get color schemes right, it’s further evidence that you’re not getting design.
This is the first color palette we used at Campaign Donut. Selecting a collection of complementary colors makes it easier for your designer to keep graphics on-brand.
Look for Proper Spacing and White Space
The spacing of a particular design will tell you a lot about the quality of designers who will be working on your projects.
Is everything crammed into the graphic leaving it to feel like there isn’t any room to breath?
Are you able to discern what the main focus of the graphic should be?
Are elements pushed all the way to the sides of the graphic, almost feeling like they’ve been cut off?
If it’s a flyer or a brochure, is there room on the sides for cutting into full bleed?
The team at Campaign Donut has used several unlimited design services and finding a service with designers who understand spacing – particularly margins, bleed, and overall print spacing – has been one of the biggest frustrations.
If you see any spacing that looks weird in their portfolio, take that into consideration when making your decision. Should you go forward with an unlimited design service, be sure to specify for proper spacing.
One of the most important aspects of design is spacing. Professional designers will automatically build this spacing into their designs, whereas someone who is trying to produce a graphic will often forget to leave breathing room.
Using A Graphic Design Request Checklist
Because most of the unlimited graphic design services are actually more about graphic production, the way you organize and word your graphic request matters.
There is a good chance that the person fielding your request will not be located in the United States and, furthermore, they will natively speak your language. There will be lots of room for miscommunication and misinterpretation and having clear communications written down will go a long way to helping you get the most out of your designer.
There is already a large communication gap between those requesting graphic design and those producing the design. It’s the same type of communication gap that exists between doctors and patients or investment advisors and clients. Professionals in their field will have a series of questions combined with exercises to help learn about your desired end result. Professional graphic designers are very similar.
At Campaign Donut, when we were going through the process of designing our brand and logo, the illustrator we worked with helped our team articulate what we wanted through questions, surveys, and providing examples. These steps helped us communicate to the illustrator in illustration terms.
It is never a bad idea to have a standardized way of requesting design work, whether from an inhouse employee. It is definitely a necessity when working with a designer assigned to you through an unlimited graphic design service.
Creating a graphic design request checklist is a very easy way to ensure you cover all your basis in your request and minimize the potential of being frustrated or disappointed with initial returns on your design.
How to Create A Graphic Design Request Checklist
Creating your form doesn’t need to be complicated. It also does not need to be a one and done proposition. After you begin to use your form, you can add new elements as you discover need. For instance, if you want to edit the graphic later but the designer used fonts that are not free to download, you may want to add a point in your request checklist to “Use only free and publicly available fonts.”
Our team employs full-time graphic designers, however, we continue to use unlimited design services for smaller items below is a list of what we have included in our request checklist.
What Are We Creating (Facebook post, brochure, logo, infographic etc)
Project Title
Description of Work
Design Dimensions (What is the size of this design?)
What software should be used?
Deliverables (What file type is the final design? JPG, PNG, etc.)
Brand Colors (What colors should be used?)
In addition to providing the details above, you’ll also want to provide visual examples for the designer to follow and gain a clearer picture of what you believe a finished product should look like.
At Campaign Donut, we provide visual style examples and example files.
Visual Style Examples — Examples of your brand’s visual style applied to various graphics. Share visuals that contain your brand colors, logo, and design elements.
Example Files — Examples for the designer to better understand your project request. These examples can be from other brands as long as they provide a clear direction for what you want in your final design.
Diligently providing these details (and any others that may pertain to your specific project or unique brand) will increase the chances you get exactly what you want.
A Round Up of Unlimited Graphic Design Companies
There are dozens of new unlimited graphic design companies launching every month and going through each option can take quite a bit of time. Below is a round-up of companies that appear to be the best unlimited graphic design service options. We have not used all of these options, however, using the criteria listed above, we have included only those which we believe are worth exploring.
Basic Design Types Offered
Nearly all of the design services profiled below will offer the same basic types of design. These include:
Logos
Branding
Social media graphics
Digital ad graphics
Flyers
Brochures
One page promo
Posters
Business cards
Letterhead
Envelopes
T-shirt designs
Trifolds
Short ebooks
Designhill Tasks
On the Designhill homepage you are met with the option to run a graphic design contest but if you continue to search you will soon find the Designhill Tasks services – an unlimited graphic design service priced at $399 month.
Free Trial
Designhill offers a free trial which includes requesting one desk. It is unclear from their home page whether or not you’ll receive the source files or have licensing permissions to use this single design.
Design Hill Plan Features
The $399 monthly service represents their only package and includes the following features according to their website:
Unlimited design requests
Unlimited revisions
Unlimited brands
Daily output
A dedicated customer success team
A dedicated designer
Native Adobe files and source assets included
No contract. Cancel anytime.
Types of Unlimited Designs Offered at Design Hill
The Design Hill service will deliver a wide range of graphic types – all fairly standard among other competing services.
Blog Graphics
Social Media Graphics
Lead Magnets
PPC Ads
Slide Decks
Flyers & Brochures
Business Cards
Covers & Mockups
Banners
Icons
Infographics
And more
Notable Missing Design Types
Their service covers all the basic types of designs – however, there are a few notable omissions that are available on other similar services at similar price points.
Logo Design
App Design
Web Page Design
How Projects Are Handled at Design Hill
It’s not clear exactly how project requests are handled with Design Hill. Their website explains ‘how it works’ as:
Add design requests — Add as many design requests to your queue as you want, anytime!
Get a dedicated designer — We’ll provide a “time quote” on each request and assign you a dedicated designer, who will start work on your request right away.
Get Work Done — We work through your queue as quickly as your plan allows.
Get Complete Ownership And Download High Quality Files — Get all the source files and complete copyright and ownership of your designs.
When trying to sign up for a free trial the form presented was a “Request a Design Consultation” and it wasn’t clear what we should expect going forward. It may be worth talking with their support to get any questions answered prior to starting.
Designhill Portfolio and Example Work
There is a decent amount of work displayed on the Design Hill landing page. You should be able to set a fairly decent expectation for what you can expect when working with their service.
Designhill doesn’t provide many examples of work produced through their unlimited graphic design service. They offer a scrolling slideshow with approximately 8 graphics.
Reviews from Happy Designhill Users
“Maintaining a design team for our clothing range was out of budget for us, so we researched & found Designhill’s Unlimited Graphics Design Service. The service is amazing and at a reasonable price.” — Sam_fertig
“From business card design to brochure design there were so many designs that we needed for our newly launched spa. Thanks to Designhill, at $399/month we got so many of our design needs fulfilled.” — Harold
“Designers, customer support and the process, all was just superb. At such an affordable price, we got all our graphic design requirements done. A big thank you from all our restaurant staff.” — Zul Arifianto
“We needed to promote heavily our new segment of second hand sedan cars. Thanks to Designhill’s unlimited graphic design service we were able to meet our design needs within our budget. The designs were of top quality.” — Jontun
Penji Unlimited Graphic Design
The Campaign Donut team has actually used Penji and we can report that Penji original designs are decent. We ultimately stopped using Penji because the turnaround times began slipping further and further away from the promised 48 hours. We began expecting 3-4 days turnaround times on requests and revisions. There was one scenario where we waited 7 days for a revision.
After voicing our concerns multiple times with our assigned team leader, the times did not improve and the output quality decreased.
Still, as far as unlimited design services go, Penji was a better option than two of the other services we tried.
On their homepage they tout themselves as the “#1 Rated unlimited graphic design service” and display the logos of brands like Reebok, PepBoys, Famous Footwear, Cost Plus World Market, and Express.
There is no free trial with Penji, however, there is a 15-day money back guarantee. So you’ll need to pay for a month of service to try Penji, however, you can request a refund if it isn’t up to your standards.
Penji Plan Features
Penji offers two plans as well as a “Custom” option that is coming soon (though this has been the case for 6+ months at the time of this writing). The only difference in the plans is the number of design profiles and allowed active projects.
For one active project and one brand profile the monthly cost is $349 per month. For two active projects and unlimited brand profiles (think agency use) the cost is $648.
Each plan includes:
Unlimited design requests
Unlimited revisions
Unlimited stock photography
Web & app design
Dedicated designer
15 days money back guarantee
No contracts, cancel anytime
We actually loved the design profile feature Penji offers. After signing up for your account you’re prompted to create a profile where you provide brand styling information for the Penji staff and includes the following fields:
Company Name
Profile Description (Company Description)
Industry
Website
Logo files — Upload all the versions and variations of your logos. Please also include vector Adobe Illustrator, or Photoshop version if possible.
Marketing Materials — Upload as much of your marketing material as possible including brochures, flyers, pamphlets, billboard designs, car wraps, advertisements etc.
Images and Photos — Upload stock photos you typically use or photos of your office/staff/clients/work etc. These photos may be used in some of your design.
Brand colors
The design profile expedites the request process and ensures that your brand design is used when appropriate.
Types of Unlimited Designs Offered at Penji
Their service covers all the basic types of designs and includes more advanced design such as application design and website illustration and layout.
On the Penji website they categorize their designs as the following:
Logo & Branding
Promotional materials
Website & apps
Labels & packaging
Flyers & infographics
Custom illustrations
How Projects Are Handled at Penji
Having used Penji (and I, myself, have interacted with their process) we can report that their system for handling projects is top notch.
Penji has developed their own, what appears to be custom, online portal for submitting requests, viewing proofs, communicating with your designer, and managing all your projects. It’s very easy to use and very helpful.
They describe their process for individual users as following:
Create design project — Tell your designer exactly what you want to design. A designer will automatically be assigned and get started on your project.
Feedback & revisions — You’ll get your 1st draft within 48 hours for most projects. Not quite there yet? Leave revision notes using our Point and Click feature.
Approve and get files — Once you’re satisfied with one (or several) design submissions, click “APPROVE” and download your files immediately. Yep, that’s right—immediately.
Everything is handled within their interface and it’s very easy to navigate and get things done.
Regarding the “Approve and get files” right away, you can expect to download the non-source files right away. There are instances where you’ll be going back and forth on a design and the only files uploaded are single layer images. Once approved, you can use that file, however, we usually had to wait several hours to a full day to get source files.
Penji Portfolio and Example Work
While some unlimited graphic design service portfolios are limited with examples, Penji does a great job showing off their work. Penji was the first service we tried and we decided to pull the trigger based upon the quantity and quality of work displayed on their website.
Penji provides a thorough and comprehensive portfolio for browsing. You should be able to get a feel whether or not this is the service for you by looking through their examples.
Reviews from Happy Penji Users
“Penji delivers exactly what I need for my business! The communication platform is perfect for talking back and forth with designers and they usually nail my designs on the first try! Highly recommended!” — Carl
“Unbelievable communication to and from Penji which is an absolute must these days. I can appreciate a company doing things the right way, not just the easy way. Designs are top tier quality and the platform is beautiful, clean and easy to use. Excited to see where Penji can take my dreams and turn them into realities! Love the team and they are incredibly patient. You will get every dollar worth of investment to Penji, as I am a incredibly happy customer.” — Robert
“We used Penji to create some core pieces of promotional assets for our annual event, the PHL Innovation Picnic and they were wonderful to work with. The whole process from start to finish was easy to manage, quick turn around and great communication throughout. We were impressed by the design quality and ease of the platform. Highly recommend for those without in house design team.” — Nicole
“Penji is an awesome platform with extremely talented Staff. Logo design and a host of other services. I am very happy with the service and quality provided.” — Alfred
Graphics Zoo Unlimited Graphic Design Services
At the time of this writing, Graphics Zoo has invested in Facebook Ads and it caught my eye. I signed Campaign Donut up for Graphics Zoo to see how it compared with other unlimited graphic design experiences.
First impressions with Graphics Zoo are positive. Their website is modern, informative, and well designed. The portfolio page is well stocked and well organized with attractive designs that are, for the most part, quality. The signup page and pricing options are clear and easy to understand.
After signing up the first request was submitted. The request was for 4-6 templates we could use for social media. Three days later we received our design back and it was pretty underwhelming (especially given that it was 3 business days to receive the designs back).
Graphics Zoo allows you to make comments directly on your design, giving pinpoint accuracy to your comments.
The designer had, essentially, selected a photo and placed plain text on top of it. Very little design effort, especially considering we had uploaded examples of what we had hoped for.
Despite this, Graphics Zoo still shows signs of being a quality unlimited graphics design service and is worth a look.
Free Trial
Graphic Zoo does not offer a free trial, however like many other services, they offer a 14-day risk-free trial. When you sign up for an account, you have 14 days to decide whether or not you’d like to stay. When we went through the process of requesting a refund, they were very gracious and didn’t give us a hard time at all.
Graphics Zoo Plan Features
There are three published plans at Graphics Zoo: Starter Plan, Business Plan, Agency Plan.
The Starter Plan is a unique spin that is different than other services. Rather than unlimited graphic design, for $99 a month you receive 3 requests for that month and a turnaround time of 2 days. You can have 1 active request at a time, meaning, when request 1 is finished, request 2 will begin.
The Business Plan and Agency Plan are virtually identical. The only differences are with a business plan you get 2 active requests at a time while Agency Plan gives you 4 and the Agency Plan offers “White label” which allows you to use their platform to handle requests from your clients to their team. Pretty cool.
Features offered in both in Business Plan and Agency Plan include:
Share and Collaborate
Unlimited Brands
Unlimited Revisions
Quality Designers
Dedicated Support
Unlimited Free Stock Images
No Contracts
User Management
Email Requests
The Graphicz Zoo features page on their website goes into greater detail what each of these features actually means for the user.
Types of Unlimited Designs Offered at Graphics Zoo
Graphics Zoo offers what you would expect after exploring multiple unlimited graphic design services. Published on their website, you can request:
Social Media Posts
Web & Mobile UI / UX
Flyers & Brochures
Product Packaging
Print Collateral
Logo & Branding
T-Shirt Designs
Looking through their portfolio, they also featured custom icons & illustrations. There are no notable missing design types.
How Projects Are Handled at Graphics Zoo
Graphics Zoo offers two ways of handling requests: using a request portal that you sign into and also allowing you to email your requests in. For each request they use what they call their “Project Flow Technology” which is essentially a card system that features all your requests with a badge indicating the current status of that request.
Graphics Zoo has a very aesthetically pleasing project management portal that helps you see everything going on with your design including latest activity.
At the time we signed up for Graphics Zoo, they used a chat interface to manage comments. It was designed like a real-time chat box, which compelled me to want to type like I’m chatting, but there was minimal activity. The chat feature didn’t feel very effective.
Still, having a go-to portal makes it easy to see where your projects are at and what to expect next.
Emailing requests is exactly what it sounds like: sending an email. Here is what they have to say on their website:
Submit your requests via email and they will automatically get added to your dashboard. All you have to do is send an email to newrequest@graphicszoo.com with the details of your project and let us handle it from there.
What matters most is if your designs will be delivered on time… as mentioned above, we waited from the 14th to the 17th for our first design.
Portfolio and Example Work
The Graphics Zoo portfolio is extensive and the designs appear to be of nice design quality. The portfolio is a very big reason why we gave it a try. The designs we received back were vastly different in terms of design than what they show on their portfolio.
Still, they clearly have capable designers based upon what they show on their website.
Graphics Zoo provides a variety of portfolio pieces to help you make your decision on whether or not their style will be a fit.
Reviews from Happy Graphics Zoo Customers
“I’ve been using Graphic Zoo for Marketing materials over the last 8 years with different companies for various projects. I have never been disappointed with their quality or service. They are super friendly, accommodating and almost always have my projects finished in advance of my requested deadline and they always look fantastic.” — Shawna
“Graphics Zoo has been amazing to work with for my graphic design needs. They are fast and the designs are always on point. They do a great job following directions I provide, and the design queue makes it easy for me to prioritize all my design jobs needed. Their service has become an invaluable resource for my company!” — Patrick
“I’ve been through dozens of design teams and none of which ever checked off all the boxes- price, turnaround time, consistency, and accuracy. I’m actually ‘wowed’ by this company and will have my loyalty for years to come from my circle. Highly recommend to anyone looking for design work. If you can visualize it then they can create it!” — Skylar
“I am so glad I found Graphics Zoo. Prior to signing up with you guys, I was struggling to find a decent designer and had to re-teach my business model each time I found someone. With you guys, I feel like I have my own personal in-house design team and no longer have to re-invent the wheel every single time I need a new design done.” — Timothy
Design Pickle Unlimited Graphic Design
Design Pickle is the company to make unlimited graphic design an accessible service. Their successful marketing not only helped grow their business but also emboldened hundreds of other designs services to throw their hat in the ring for the share of customers looking for affordable graphic design.
Despite a lot of competition, Design Pickle still maintains an industry leader status and had worked hard to improve upon its marketing and service.
Free Trial
Like many other services, Design Pickle forgoes a free trial and in its place offers a 14-day guarantee. On their website they describe this as the following: All plans come with a 14-Day No Risk Guarantee. Love the service, find it a huge value for you and your business or you can get a 100% full refund for your initial membership fee.
Design Pickle Plan Features
There are two plans offered by Design Pickle, their Standard Plan and their Pro Plan.
Both plans include the following:
14-Day No-Risk Money Back Guarantee
A Dedicated Professional Designer
Unlimited Requests
Unlimited Brands
Free Stock Photos (via Unsplash)
No Contract
Dedicated Support When You Need
Zapier Integration
Live Chat & Training
The Pro Plan includes quite a few more enticing features that we haven’t seen available in other services. These Pro features include:
Real-Time Collaboration via Slack
Same-Day Delivery
API Access
Increased Turnaround Times & Design Output
Expanded Design Scope:
Advanced Infographics and illustrations
Digital design and page layout
2-3 second custom animated GIFs
The Real-Time Collaboration via Slack could be a huge win for a lot of business owners. One of the major issues with unlimited graphic design services is the revision process because it takes nearly 24-hours for each revision. With real-time collaboration, you can communicate exactly what you think to your designer as they’re making changes.
Increased Turnaround Times & Design Output definitely gives business owners who rely heavily on graphics something to think about and it may be worth starting with the Standard Plan to discover if Design Pickle will give you the quality you’re looking for and then moving to the Pro Plan as you decide to make the full commitment.
That Slack communication feature is very intriguing.
Types of Unlimited Designs Offered at Design Pickle
The experience of Design Pickle really shows in all of their material. As I was gathering information for this section of the article I found a support document created by Design Pickle Founder, Russ Perry, that outlines everything you can request with Design Picke. I was linked to this support article from the pricing page.
On the pricing page you’ll find the following FAQ:
Q: Can I design _______?
A: If you have a graphic design need, first ask yourself: Can I reasonably explain or show what I want? If the answer is yes – fantastic! Our scope of service is broad but firmly anchored in graphic design (for now). If you need motion graphics, copywriting or a latte, we, unfortunately, will come up short. Click here to review our full scope of service.
Here is the list of services provided by Design Pickle:
Display ads
Print or digital brochures
T-shirt graphics
Trade show marketing materials
Facebook ad graphics
Instagram graphics
Google display ads
Social media quotes
Promotional items
Outdoor graphics
Stickers
Sales sheets
Event flyers
Email header graphics
Blog header graphics
“Hero” images for your website
Basic photo edits & manipulation
Knocking out backgrounds
Ecommerce graphics
Logo updates
Presentation graphics
Revising webpage mockup
Simple infographics
And many, many more types of requests
Here are more items you can create with a PRO plan:
2-3 second GIF animations
Light website or landing page design (we do not code, just provide the design files)
Original branding and logos with a clear concept or direction
More advanced illustrations
More advanced infographics
The article summarizes the list by saying, “Remember: if you can explain your request, and it’s not on the list below, we’ll do our best to execute it.”
Design Pickle also does a good job specifying what they do not do. Their list includes the following:
Video or motion graphics
Extremely complex or fine art illustrations
Fillable or interactive PDF documents
Photoshop art or complex photo manipulation
3D / CAD
HTML / CSS / UI / UX, mobile or app design
Programming/coding/development
This by far the most comprehensive breakdown of offered services provided by any of the companies offering unlimited graphic design.
How Projects Are Handled at Design Pickle
When you go to explore how the service works, Design Pickle offers a signup for a demo. You can choose from a live demo or a recorded demo. We watched the recorded demo which was presented by the founder and goes through everything you’d want to know.
Aside from this demo, there was no readily available information sharing how the service works. The video, though great, goes through a lot more than just “How does it work?” Fortunately, the video includes time stamps to tell you where to scroll in the video in order to watch what you want.
The founder of Design Pickle, Russ Perry, provides a very detailed demo video of what unlimited graphic design is and how Design Pickle works. Watch the demo here.
Portfolio and Example Work
When the Campaign Donut team was ‘interviewing’ unlimited graphic design services we looked at Design Pickle and ultimately decided against Design Pickle because, at that time, the website was underwhelming when it came to providing portfolio examples. As the primary decision maker for this choice, I was a bit surprised that the industry leader had so few examples of their work and the examples that were there were underwhelming.
That has changed.
At the time of this writing, Design Pickle has updated their portfolio to provide an almost overwhelming amount of design examples. Not only are there a greater number of portfolio examples, the designs as a whole are higher quality.
How they feature their work is very impressive and when we are in the market again for an unlimited graphic design service, we will definitely put Design Pickle at the top of the list.
The Design Pickle website portfolio is exhaustive and provides a very good idea of what their designers are capable of.
Design Seed Co. Unlimited Graphic Design Service
Design Seed Co. is the service we ultimately chose to stick with for Campaign Donut. Our choice was influenced by two factors: the value for the price we pay and the quality of designs in their portfolio.
The entire web experience of Design Seed Co. is fairly underwhelming. However, at the time we were making our decision to switch from Penji to a different service most of the websites and portfolios resembled one another and none really stood out among the rest.
Free Trial
Design Seed Co. is different than any of the other services profiled in this article as they do not offer a free trial nor do they offer any sort of satisfaction guarantee. This may be a bit off putting for some users who are concerned about spending money, however, the low end design option is very affordable and may provide you with a workable solution in place of a guarantee or free trial.
It may also be worth reaching out to Design Seed Co. to inquire about any unlisted options to see if they can work with you in order to help you decide if their service is a right fit.
Design Seed Co. Plan Features
There are three plans offered through Design Seed Co. The Business and Enterprise plans contain the following features:
Unlimited Total number of Task
Unlimited Revisions
Source file**
Up to 1~3 business days Turnaround
Resell Designs
No Contract/ Cancel anytime
Total number of BrandsUnlimited
Sales Web Landing Page Design
Basic Website Design (Up to 5 pages)
App Interface Design
Logo Design
Basic Brand Guideline
Package or Label Design
Marketing Material Design
T-Shirts Graphics
General Graphics Designs
Social Media Graphics (Up to 5 post graphics at a request)
The only difference between the Business and Enterprise plans is the number of tasks serviced at one time. Business is 2 simultaneous tasks and Enterprise offers 3.
The entry level plan offers 1 task at a time along with all the features above with a few exceptions:
No License to Resell Designs
No Basic Website Design
No App Interface Design
No Logo Design
No Basic Brand Guideline
If you are using the service explicitly for your own business (not as an agency) and do not need multiple designs at once or complex design, the entry level plan, Design Seed Co., may be a great fit.
Types of Unlimited Designs Offered at Design Seed Co.
Design Seed Co. provides nearly all of the types of design that you’d expect. On their website, they list the following in a grid design:
Print: Brochure, Poster, Catalog
Digital: Web design: Banner ads, eGift card design, Email design
Social Media: Social media cover design: Social media post, Social media ads, Blog post graphic
Branding: Logo design, Business card, Stationery, Email signature
Packaging: Label design, Price tag, Store POP display
Imaging: Edit white background, Product image, Lifestyle photo
Restaurant: Signage, Menu design, Wall graphic, Digital menu design
Graphic: Infographic, Pattern graphic, Icon
Publication: Book cover, Magazine, Page layout design
As mentioned above, if you would like basic website design, app interface design, logo design, or basic brand guidelines, you’ll want to sign up for the Business or Enterprise plan.
In our experience, Design Seed Co. has been able to deliver any request we’ve made and has done a good job of providing designs that need little to no final touch-ups by our in house design staff.
How Projects Are Handled at Design Seed Co.
All aspects of each design tasked are handled through Design Seed Co’s task portal. When you sign up for an account you are given access to their branded portal which is where you will submit new projects, upload source or example files, carry on discussions with your designer, mark projects as approved and download source files.
Design Seed Co. utilizes a special client portal to manage design tasks. It’s a very simple solution, not super elegant but gets the job done.
Whenever there is new activity inside the client portal bu your designer you will receive an email notification. You’ll receive notifications when you successfully create a project, when a designer has been assigned to your project, when a designer has begun work on your project, when a new comment has been made, and when a new file has been uploaded by Design Seed Co.
The emails do a good job of eliminating the need to continually check the website to see where your project is.
Portfolio and Example Work
What compelled us to try Design Seed Co. was the combination of value pricing plus the strength of the portfolio. If they could produce two tasks at one time and deliver designs consistent with their portfolio, it was worth the risk.
So far, we’ve been very happy.
Not everything we’ve received has been as clean as what we see on their portfolio page and there are some instances where it feels like certain designs are being phoned in, overall, we’ve been pleased with our designs.
The Design Seed Co. portfolio is a very nice presentation of their work and really helps their offer standout from other similar companies and offers.
Additional Unlimited Graphic Design Services to Explore
It’s worth noting that there are far more services than what we’ve profiled above. Here is a list of additional services we discovered during our search.
Final Thoughts On Unlimited Graphic Design Services
By now you should feel more equipped to make a decision regarding which service is going to be right for you.
Before I signed up the Campaign Donut team for unlimited graphic design I felt a huge weight of, “I don’t want to get this wrong.” I didn’t want to waste money and, more importantly, I didn’t want to waste time.
In the end, the best way to discover which service is right for you is to sign up for the one that looks most promising based upon the factors that are most important to you. Here are a few ways to help set expectations for your first experience so that you don’t feel like you’re wasting time or money:
Commit to spending the money on a service and know that it may take signing up for two or three services before you find the one you want to stick with.
Have patience with your designer as he/she learns your likes, dislikes, and overall brand tone.
Request designs that you have time to collaborate on. Avoid making requests that need a 24-hour turn around.
Provide as many details as possible when making your requests and include examples of what you hope the end product will look like.
Be okay with moving on from a company when it just isn’t working out.
If you have any question about selecting the unlimited graphic design service that is right for you send us a message or leave a comment below. In some cases we may be able to provide a quick solution, in other cases we may redirect you to reach out to the individual services themselves for answers.
At the end of the day we want you to feel empowered to create great digital marketing content, so let us know if we can help!
Google Search Console (formerly Google Webmaster Tools) is the most underused SEO tool available to website owners today. This free tool provided by Google allows site owners to connect their website content DIRECTLY to Google’s search engine.
Not only does Google Search Console help you supply Google with the best information regarding your website, it also provides insights into how your site is performing in Google searches. These insights are coming DIRECTLY from Google and are very easy to understand and provide a great foundation for making decisions for your SEO and SEM strategies moving forward.
There are two reasons why Google Search Console is so underused. The first reason is that many website owners simply do not know about it. The second reason is that it may be confusing for someone unfamiliar with website tools like Search Console to actually submit their site and successfully verify ownership.
In this tutorial, you will be guided step-by-step how to create a Google Search Console account, successfully verify ownership of your domain, and submit your website’s sitemap directly to Google to ensure your website is correctly indexed and it’s pages are available for Google to display in search results.
Step 1 — Login to Google Search Console
Visit the Google Webmasters website and click the green “Search Console” button.
Google Search Console (formerly Webmaster Tools) is free and available to anyone. Any Google account will give you access to Search Console. If you do not have a Google account, you will need to include one.
If you are not logged in you will be redirected to a second page and need to click the “Start Now” button to be brought to the sign in screen. Click the blue “Start Now” button to be redirected.
If you are not logged in to Google, you will be redirected to a second screen before accessing the Search Console tools.
Step 2 — Add Your Website to Google Search Console and Verify Ownership
After logging into Google Search Console, if you’ve never added a site before you will be met with a welcome screen, “Welcome to Google Search Console. To start, select property type.”
In order for your website to benefit from the tools in Google Search Console you need to verify that you own the domain. If you have access to your domain DNS settings, in almost all circumstances you will want to use the “Domain” option which will register all your property variations at one time. If you do not have access to edit your domain DNS settings, you can prove site ownership using the URL Prefix option which provides several methods for authenticating ownership.
Use the “Domain” option and type in your website URL “campaigndonut.com” and click continue. Your next step will be to take the text provided by Google Search Console and add create a new DNS record in your settings — a TXT file that places the record into the value field. Once you add the record, you’ll save your results and return to the “Verify domain ownership” screen.
In order to use Google Search Console with your website, you will need to authenticate ownership using one of Google’s verification methods. In this example we are using verification through the creation of a TXT file in the domains DNS settings.
It will take a few minutes (and even up to 24 hours) for your domain record to be visible to Google. Click the “Verify” button and if it doesn’t verify right away, wait 10-20 minutes and try again.
Once you have added your record and the site has been successfully verified, Google will display the “Ownership verified” message and you can click “Go To Property” to move forward.
It could take up to 24 hours for your DNS record to update and for Google to be able to verify ownership.
Step 3 — Submit Your Sitemap for Indexing In Search Console
Most website include a sitemap which is a dynamic file that serves as a map for everything located on your domain. Providing Google with your sitemap allows Google to index all of your website content — not just the content its robots are able to find and scrape.
In addition, the sitemap provides structured data that Google’s algorithms can use to better interpret your content and make it available for the most appropriate searches.
Click the hamburger menu in the left hand corner of the screen to reveal the menu and select “Sitemaps” several items down from the top.
Your website sitemap is a page by page blueprint of your website that provides Google Search Console with precise date for what content is on your website and how it is organized.
When the screen loads you’ll be prompted with a view saying “Add a new sitemap”, and an empty text field to the left of your domain name. This is where you will place the sitemap url and click the “Submit” button.
After clicking submit, if the file appears correct, you will receive the message, “Sitemap submitted successfully. Google with periodically process it and look for changes. You will be notified if anything goes wrong with it in the future.”
Depending on the amount of content you have published on your website, the sitemap could process in a matter of moments, all the way up to hours. Once it’s been successfully processed, you’ll see a green “Success” message in the status column. Once successfully submitted, your site context will be submitted for indexing for Google search results.
This is not a guarantee that your website will start showing up in Google search results. This is simply telling Google that your site exists and informing them what content is on your site and where it is located.
Successfully submitting your sitemap for indexing through Google Search Console provides Google with a blueprint of what is on your site and where it is located.
Step 4 — Troubleshoot Any Errors
One of the best things about Google Search Console is that it will reveal errors that might be occurring when attempting to index your site. Some of these errors not only mean certain pages on your site cannot be indexed, but can actually adversely impact your site’s overall ranking. In some instances you may see items being reported as errors in Google Search Console when in reality it is not an error. For instance, if you have certain directories on your website which you wish to block from index and prevent from showing up in searches, these can show as errors.
It is very important to resolve errors and in the cases where non-errors are being reported (i.e., blocked files) it is important to be aware of which are actual errors and which are not.
Errors in Google Search Console provide insight into what may be negatively impacting your website search performance.
Questions?
If you have any question about adding your website to Google Search Console, submitting your sitemap to Google for indexing, or troubleshooting errors, send us a message or leave a comment below. In some cases we may be able to provide a quick solution, in other cases we may redirect you to either Google support or another resource.
At the end of the day we want you to feel empowered to create great digital marketing content, so let us know if we can help!
Back in my web designing days there was one finishing touch that all my clients wanted for their website—after the favicon: the copyright year added to the WordPress footer.
The problem: I couldn’t find a solution that didn’t involve some form of JavaScript.
Until I did.
It’s been so many years that I cannot remember when or where I found this solution but it has been the same solution I’ve used to dynamically update WordPress website footers with the current year.
It’s simple. It involves updating your functions.php page one time and can be applied via shortcode.
I am sure there are plenty of better ways to do this that involve more complex coding—I just don’t know how to apply them and if you’re like me, you don’t want to take the time to learn.
A dynamically updating copyright year means that it will automatically update to the next calendar year when January 1 arrives, preventing an outdated copyright year.
So without further delay, here is a very short tutorial showing you how to add a dynamic copyright year to WordPress footer.
*Prior to making any changes to your WordPress theme files or WordPress core files you should backup your files and database.
Update Your WordPress Functions.php File
It is strongly recommended that you use a child theme when applying the following code. Using a child theme ensures that when your theme developer pushes an update to the theme, the changes you make today will not be overwritten.
Step 1 — Access the Editor Window
Login to your WordPress website and navigate to “Appearance>Theme Editor” (or it may say only “Editor”).
From the list of theme files in the right column, click the “functions.php” file.
WordPress built it editor allows you to modify theme files directly. Make sure you know what you’re doing because one error can throw off your entire site design.
If you are using a child theme and this is the first time you are making a change to your “functions.php” file, you won’t see much—if any—code.
If you are not using a child theme and making changes to your theme’s “functions.php” file directly, you will see quite a bit of code already written.
Step 2 — Add The Date Code to Your Functions.php File.
Inside the editor, you will paste the following code.
This simple line of code placed in your functions.php file will create a shortcode that you can call in other places on your website.
Once you’ve added this code, click the “Update File” button to apply the changes. You won’t see anything immediately on your site because we still need to apply the the shortcode to the footer. As long as the file updates successfully, you can move on to the next steps.
Add the Year Shortcode to Your WordPress Footer
Now that your “functions.php” file is updated, you need to tell your theme where to output the dynamically generated year. Unfortunately, this step could vary based upon what theme you’re using. Most premium themes make it easy to update the content in your footer, or in some cases it is called the socket, but if there is not a clear location, you will want to contact the theme developer.
For this example, I am using the Enfold Theme by Kriesi available on Themeforest.
Step 1 — Locate Your Theme Footer Settings
Often your footer settings will be located in a theme specific menu section. The Enfold Theme offers this section labeled “Enfold” or “Enfold Child” — obviously, if you’re using a child theme.
Access the theme settings and navigate to the footer settings menu.
Step 2 — Add the Year Shortcode to Your Footer Settings
Once you locate your footer settings, place the shortcode [year] to output the current year on the front end of your website.
Where your theme footer settings are located will depend on what theme you’re using. In the Enfold Theme, there is a dedicated “Footer” menu inside the theme settings.
Step 3 — Add the Copyright Symbol to Your Footer
Some themes will automatically generate the copyright symbol and some will require you to add it.
Once you’ve added your shortcode and copyright symbol, save your settings.
Step 4 — Visit Your Website to Confirm Your Changes
After making any changes to your website—even publishing updates on old pages—it is very important to review your changes to confirm everything is as it should be.
To review your changes to the footer, navigate to your homepage and scroll down to the bottom of the page. You should now see the correct year outputted to your footer.
Always verify your changes—even if it is simply updating a spelling or grammar error. Here we are confirming the correct year output in our footer.
Questions?
If you have any question about configuring your WordPress site to output the current calendar year in your footer dynamically, send us a message or leave a comment below. In some cases we may be able to provide a quick solution, in other cases we may redirect you to either WordPress forums or your theme’s support desk.
At the end of the day we want you to feel empowered to create great digital marketing content, so let us know if we can help!
There may be a number of reasons why you might need to locate your ClickFunnels ID and your ClickFunnels Funnel Step ID. These IDs help you integrate ClickFunnels with webhooks as well as automation programs like Zapier and Integromat.
Here are instructions how to locate your ClickFunnels Funnel ID and ClickFunnels Funnel Step ID.
Log in to ClickFunnels and navigate to the Funnels page. Click the Funnel you need to identify the Funnel ID for.
Locate Your ClickFunnels Funnel ID
Once the funnel loads, look to the URL in your web browser to identify the number that is in between funnels and steps:
/funnels/xxxxxxx/steps/34210860/overview
Your ClickFunnels Funnel ID can be found in your browser after funnels/ in the URL.
Once you have your Funnel ID you can go on to identify that particular funnel using tools such as Zapier and Integromat to greater control where your data flows and how it is used.
Locate Your ClickFunnels Funnel Step ID
Finding your ClickFunnels Funnel Step ID is just as easy! Using the same method as above, you’ll want to select the specific step in your funnel from the “Funnel Steps” column on the left side of the screen.
After that funnel step has loaded, look back to the browser and locate the number after the funnel ID and steps:
/funnels/6655978/steps/xxxxxxxx/overview
Your ClickFunnels Funnel Step ID can be found in your browser after steps/ in the URL.
That’s it!
If you have any question about locating your ClickFunnels Funnel ID or Step ID, send us a message or leave a comment below. In some cases we may be able to provide a quick solution, in other cases we may redirect you to ClickFunnels support.
At the end of the day we want you to feel empowered to create great digital marketing content, so let us know if we can help!